AlterKnits Stitch Dictionary Review

A copy of AlterKnits was sent to me for free from Interweave, but all opinions are my own.

9781632505538_300dpi.jpg

Andrea Rangel is a prolific designer known for her colorwork and rustic, wearable patterns--the kind of designs meant to be loved and worked in, not stored away for fear of ruining. She also happens to be one of my friends in the industry, and I loved her first book Rugged Knits, which was strictly a pattern book. Andrea's second book, AlterKnit Stitch Dictionary, captures her love of colorwork with 200 original and fresh knitting motifs.

Fun fact: Andrea's husband Sean (who is an artist) drew all the motifs in the book! I think this creative input from someone outside the industry is what has helped make this book so unique, since I assume Sean wasn't bogged down with years of traditional knitting motifs in his head. Andrea notes in the introduction of the book that Sean knows how to knit, but doesn't practice it much so he doesn't "think like a knitter."

Like most Interweave books, the first 22 pages are devoted to basic colorwork theory, from choosing colors to different stranding techniques. As a seasoned knitter I personally hate how every knitting book has to include this background knowledge, but I get it. At least with AlterKnit, it doesn't take up too much space and you can quickly move onto the best part--the stitch patterns!

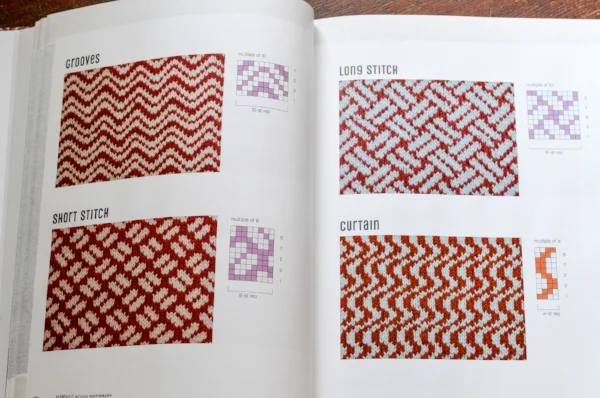
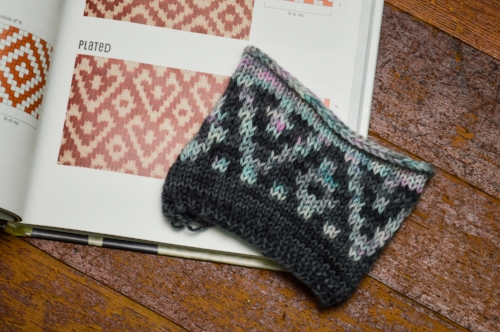
The motifs aren't divided into categories or chapters. On one hand, this is nice because it encourages browsing, but on the other, as a designer it would be more helpful to have the motifs divided by style (geometric, nature inspired) or by stitch repeat size (12 st rep, 20 st rep). The swatches are clearly photographed and of a generous size, and the color combinations Andrea chose are so...Andrea!

Take a look at some spreads from the book below to get a feel for the layout, color schemes, and scope of the designs.

DSC_0217.jpg
DSC_0219.jpg

The book also includes several designs and tips on how to replace the motifs used with other motifs in the book. This is a great touch and a smart way to make the included designs go further, as knitters can knit multiple versions using different motifs! Andrea has said designers are free to use the motifs in their designs, and I'm already using one in an upcoming sweater worked in Blue Moon Fiber Arts Cake DK.

DSC_0185.jpg

As someone who owns quite a few stitch dictionaries already, is AlterKnit worth it? I say YES if:

  • You are a designer who loves colorwork.
  • You are a knitter comfortable with modifying patterns who loves colorwork.
  • You fall into either category above and especially love modern and quirky motifs.

If you prefer to knit patterns as-is and don't like substituting stitch patterns or figuring out math, I don't think this book will have much value to you as a knitter unless you happen to love all the patterns as they are. If you are comfortable with modifications or designing your own patterns, AlterKnit Stitch Dictionary is a fantastic resource for the colorwork lover.

Indie Gift-A-Long 2017

It's time once again for the Indie Gift-A-Long, an annual coordinated sale and KAL by indie designers. As always, you can save 25% on any patterns in the GAL with promo code giftalong2017 through 11:59pm EST on 11/28. Of course I have a selection of designs available in the sale:

Untitled design.png

But enough about me--you already know I exist, because you're here! The GAL is all about community: designers supporting designers, knitters supporting indie designers, and so on. Here are some of my favorite GAL picks that I'm contemplating adding to my queue.

Knit_Me_with_Your_Best_Shot_4_cropped_medium2.jpg

Knit Me With Your Best Shot by Mary Annarella. I had the pleasure of trying this sample on at a trunk show and it was gorgeously flattering. I am definitely feeling pullovers more than cardigans this year (forever cold club!) and I think this classic style would work well in my wardrobe. However, I don't think I have any stash suitable for this and I'm trying to use up a good chunk of my stash before I buy any new sweater quantities.

Rib_Run_The_Knitting_Vortex_medium2.jpg

Rib Run by Jennifer Dassau. This simple cable and ribbed hat is super appealing to me. I already have an extensive hat collection, but there's always room for one more, right? Most of my hats are worked in hand-dyed yarns, and this looks like a good excuse to play with a beautiful solid color.

IMG_3087_medium2.jpg

Calentito by Kristen Jancuk. These adorbale slipper socks have been in my queue since the day they were released, so I'm definitely snapping this one up! I have quite the stash of sock yarn and some partial skeins, both of which will be perfect to use up in several pairs of Calentitos. 

IMG_2865-1_medium2.jpg

Wheatly Socks by Kerri Blumer. Can you tell that I really, really need to knit more socks? I would love to have an overflowing handmade sock drawer, and a long-term goal of mine has been to work on knitting more socks! I love this simple textural stitch pattern, it would be perfect for some subtle semi-solid skeins I have.

I'd love to hear what you're stocking up on during the Indie GAL and what project you're planning to cast on first!

My Fall 2017 Making List

If you missed the concept and explanation of my Making List, you can check out my first post for more details. Essentially, it's a way for me to focus my energies on the projects that are most important to me and feel less scattered/overwhelmed about my making.

The following items from my original Making List have been completed or cast on:

  1. Saturday Matinee Socks - finished
  2. Rainbow Leyburn Socks - finished, but as a different pair of socks that I started!
  3. Lopi Pullover - cast on
  4. Fen Dress - finished
  5. Watson Bra - finished
  6. Wiksten Tank 2 - failed, but attempted before throwing in the towel!

I also practiced my spinning with some fiber from my stash.

Since my priorities are shifting with the seasonal change, along with my current break from design work, I've updated my Making List to reflect my focus for fall. 

WIPS

  1. Lopi Pullover
  2. Fibre Co Stripey Raglan - this is a carryover WIP from the first list
  3. Charlemont Thermal - another carryover
Stripey Raglan vs Lopi Pullover

Stripey Raglan vs Lopi Pullover

I am hibernating my Miss Babs Cardigan design WIP for now, since it's not grabbing my attention. But it's there when I want it!

CAST ON

  1. Bonnie Banks Shawl for my mom, in Blue Moon BFL Sport
  2. Speckled Space Socks, using one of my stash sock yarns
  3. Impromptu - but only after finishing at least one garment from the WIP list!
Untitled design (10).png

SPIN

  1. White British Wool - I destashed the yarn I was planning on using for the Brookdale Vest, which was originally in my last CO list. I'm hoping to spin this into a Brookdale-suitable yarn!
  2. Spun Right Round Merino
  3. Malabrigo Nube

SEW

  1. 2nd Watson Bra
  2. Flannel shirt for Mark
  3. Serger projects, if I can get over my fears and teach myself how to use my serger!

In addition to my original Making List 'rules', I have added these two for fall:

  1. Cast on for new items after finishing the previous object in that category. IE, finish a garment before casting on a new one; finish a portable accessory before casting on a new one. Same principle for starting spinning and sewing projects. 
  2. Use stash for everything possible. In this case, I had to purchase a second skein of BFL Sport for my mom's shawl (to go with one from my stash), and I'll need to buy fabric for Mark's flannel shirt. But everything else I have stashed!


A Bevy of FOs

Here's a quick round-up of all my recent finished projects!

DSC_0605.jpg

In August I made my first ever bra, a Watson Bra using a kit from Tailor Made Shop. I'm counting this as a Summer of Basics FO, and it's also an item ticked off my Making List--yahoo! I was intimidated by bra making but it turned out to be surprisingly easy, and my only gripe was struggling with my machine eating the small seam allowances whenever I started a new seam. I did a straight 32C with no alterations, except for the straps. They're supposed to be attached to the top of the cups with rings, but that would put the adjustable buckle on top of my traps and I prefer having the hardware on the back of my body. Next time I might experiment with taking a small amount of fabric out of the band, as it fits comfortably on the middle set of hooks but I prefer starting a new bra on the outermost set of hooks so I can wear it longer before it gets stretched out.

DSC_0585.jpg

I finished my languishing pair of handdyed socks, also a Making List item! (I'm feeling very accomplished, dontcha know.) These are nothing crazy special, just colorful, vanilla shortie socks that will always be welcome in my wardrobe.

DSC_0628sm.jpg

And last weekend, I jumped back into spinning after a long hiatus (almost a year!) To practice, I pulled this braid of Frabjous Fibers Merino Top in Scarecrow and I was pleased to discover my muscle memory hadn't faded. Yesterday I did another spin and will share photos once that yarn is dry. I have several spinning projects on my Making List, and I'd like to use up 90% of my fiber supply before I allow myself to purchase any new fiber.

I recently finished up all my design obligations, meaning I'm not contracted for any pieces and I'm not working on any self-published designs at the moment either. I'm really looking forward to taking this time to work on my Making List, sink my teeth into some longer-term sewing or spinning projects, and enjoy some selfish making time before I return to designing. Happy fall to me!

The St. Bega Set

Earlier this month, I had two new designs released with The Fibre Company as part of their Autumn 2017 Collection: the St. Bega Mitts and the St. Bega Cowl.

St.-Bega-Mitts-3_medium2.jpg
St.-Bega-Cowl-7_medium2.jpg

Worked in their new Arranmore Light yarn, both pieces are simple and rely on knitted tuck accents to gently shape the fabric and add texture. The cowl features a column of tucks at one location, while the mitts sport their tucks on the top of the wrist.

DSC_0388.jpg

Aside from the knitted tucks, it's all relaxing Netflix knitting--stockinette worked in the round with 2x2 ribbed trim!

Summer Shawl Bundle

For the month of August, I am offering a Summer Shawl Bundle: 4 shawl patterns for $12!

Untitled design (5).png

All four patterns use fingering weight yarn, and are great options for stashbusting or cranking out one last sweet summer project. Clockwise from top left, they are:

Advice From a Caterpillar, a triangle shawlette with a ribbed and cabled stitch pattern. This is the smallest shawl of the bundle and requires the least yardage. Shown in Gynx Yarns Single Merino, it requires 400 yards and measures 39" x 15.5".

Klystron is an asymmetrical shawl knit on the bias in two colors. It's knit mostly in garter stitch, with brioche stripes, and you'll need to understand intarsia to knit this. Shown in Shalimar Yarns Aerie, it requires 700 yds (420 yds MC & 280 yds CC) and measures 72" x 21".

Papelillo is a lace pi-shawl, worked from the center outwards. The lace patterns are both written and charted. Shown in Dragonfly Fibers Pixie, it requires 950 yards and measures 34" in diameter.

San Drea Shawl is another asymmetrical shawl, this time with stripes, short rows, and a lace border. This one is definitely a good stashbuster! Shown in Manos del Uruguay Fino (MC) and Shibui Knits Staccato with Nylon (CC), it requires 850 yds MC and 110 (120, 130) yds of CC1 (CC2, CC3) and measures 80" x 24.5"

Which one would you knit first?

Summer of Basics FO #3

I put off writing this post for a bit, but at the beginning of July I whipped up my third Summer of Basics item!

This is the Fancy Tiger Crafts Fen in dress form, done in some railroad denim also from Fancy Tiger Crafts. Umm...this is perfect. It came out exactly how I imagined it--better, in fact!--and sewing this was an absolute DREAM. I love sewing with woven fabric, I have discovered.

I made my Fen top in a size 4, and thought about sizing down to a 2 for the dress...but then I realized that a size 4 in the top=size 6 in the dress in the bust region, so I did a 4 in the dress. I was mostly worried about having too much positive ease in the waist and having it look more sack-like than 'gloriously casual and comfy summer dress', and am pleased with how the fit turned out. Only issue is that my lats are clearly bigger than I realized and I have to wiggle myself delicately through the waist to get it on!

My plan from the beginning was to do some kind of directional play with the stripes and have them going in different directions for the top and bottom. Again, I can't believe it worked out so well. I hadn't thought about the pocket facings when I first planned my stripe idea, so on the fly I decided to make them stripe horizontally as well and I love the contrast. 

My only mod was to make the neck opening smaller, as the Fen top is a little big for my preferences--it tends to slide to one side for that Flashdance neckline look, which I don't hate but wouldn't work for this dress. I winged this one by moving the pattern piece over a few inches and using the same neckline curve from there. I did all French seams, which is my favorite seam technique so far. You know, out of the two or three I know how to do!

Another item crossed off my Making list successfully!

New Pattern Release: Klystron

Earlier this week I released my Klystron shawl pattern!

All photos by Lindsey Topham

All photos by Lindsey Topham

I wanted to play with color and texture in this pattern, so I combined garter stitch, brioche, and intarsia. This asymmetrical shawl is knit end-to-end. It uses intarsia to create a smaller accent panel of contrast color (the purple) which runs along side the main body of the shawl, while regular rows of brioche interrupt the garter stitch fabric. Shaping is worked at the ends of rows and on either side of the off-center spine, to separate out the two colors and to create an unbalanced arrow shape at the end after binding off:

The yarn is Shalimar Yarns Aerie, which is a gorgeous single-ply blend of merino, kid mohair, and silk. Thanks to the silk and mohair, the yarn has a subtle sheen and slight fuzz which really elevates plain garter stitch to the next level. 

Klystron is available for purchase on Ravelry for $5.

A Tale of Two Socks

Last post, I told you about my making list and the projects on it. Here's to my first FO from that list, the Saturday Matinee Socks!

I started these last summer and was about halfway through the first sock...so while it obviously took me a long time to get BACK to this project, once I buckled down I was able to crank them out pretty quickly. I don't consider myself a huge sock knitter, though I like all the pairs I've made so far. Mostly I have other things I want to make more! But I'm totally a convert to shortie ankle-style socks now, getting rid of the leg made such a difference in being able to finish these before I got bored.

I was still in the sock groove once I finished these, so I picked up the other pair of socks on my making list, Leyburn. Spoiler alert: They are no longer Leyburns!

I really love how the slipped stitch design on the Leyburns works with yarns like this--which, by the way, I dyed myself during a dying session with the Kangaroo Dyer once! I just could. not. stand. the Leyburn stitch pattern, and as pretty as it looks, I'm no longer interested in making things when the process is unbearable. Partly for practical reasons (if I hate making it, I'm not going to make it and it will never get finished) and partly because I'm learning more and more that I need to enjoy the act of making as much as I enjoy the having of the finished object. 

Instead of continuing with a sock I didn't enjoy making, I ripped back to the toe and did a simple, toe-up vanilla stockinette sock. The pooling is kind of meh (I wasn't interested in playing around with my gauge a whole bunch to fix that) but they're cheerful and I'm happy to have settled on a pattern I can actually finish. Hopefully I can do something fun with the leftovers, like stripe it with white in a different pair to avoid the pooling. KNIT ALL THE SOCKS!

My Making List

I recently discovered The Craft Sessions and fell down the rabbit hole of her Stash Less blog post series. Ever since I stopped working at Webs, my yarn consumerism has been way down and even before I left there, I was starting to be more mindful about my stash. I've done several purges of yarn, leaving me with a full yarn cabinet (rather than an overflowing one!) of prized skeins that I'd like to work though over the next few years. Coupled with my new budget, my eye is on using what I have and working on projects I've been pondering for awhile rather than heading off into new directions.

Thus, I decided to follow her challenge of creating a Making List. I'm leaving myself free to remove items from this list if I decide it no longer appeals to me, but if I want to add new things to the making list, I need to have completed something or removed something in its place. Note that this isn't my dreaming, wishful thinking list, but rather projects that I am committed to making because I already own the materials and in the case of some, they're already in progress. Designs for self-publishing are included, but contracted third-party obligations are not.

WIPS

  1. Miss Babs cardigan (design in progress)
  2. Fibre Co Stripey Raglan
  3. Saturday Matinee Socks--a finished FO as of Sunday night! Currently blocking.
  4.  Rainbow Leyburn Socks
  5. Charlemont Thermal

The cardigan will be set aside shortly as I have a sweater design I need to start working on. #2 just needs sleeves! Items 3 through 5 are long-standing WIPs, and I'm excited to close those projects out. I am definitely going to finish the Leyburn Socks, but I might change my mind on the thermal and rip it instead--need to dig that one out and take a long, hard look at it!

CAST ON

  1. Brookdale Vest
  2. Lopi Pullover
  3. Anzula Ava Set (design idea)

I have the yarn for all three of these, and the patterns for 1 & 2 to boot!

SPIN

  1. Romney fleece
  2. White British wool
  3. Spun Right Round fiber
  4. Malabrigo Nube.

Spinning is the most long-term of the categories, and I do need to get back into my spinning groove with some practice before tackling these fibers, especially the fleece. I'll likely do some practice spins with stash fiber I have expressly set aside for that purpose. In all honest, I'm not anticipating getting to spinning until the fall, or at least until I finish my current sewing list as that is more important to me.

SEW

  1. Fen Dress
  2. Watson Bra
  3. Wiksten Tank 2
  4. Serger projects

'Serger projects' in this case refers to the stash of knit fabric I have and any possible projects I want to do with it. I've been thinking of some jogger-style pants, pajama shorts for lounging around the house, and a casual tee or two. But first I need to learn how to use my serger!

Here are my tentative rules for the near future:

  1. Projects in the Making List take priority over random flights of fancy. (Exceptions: Any design obligations, duh.)
  2. $50/month budget for craft supplies. For now, I see that going to patterns and notions rather than yarn or fabric since I have a good stash to work from. I can roll any unspent $ over from month-to-month if I want to save up for something bigger than $50.
  3. If I'm avoiding a Making List project or not enjoying it--frog mercilessly, give away to a friend to finish, whatever, but no wasting time on things I don't love.

It may seem weird to put this much effort and structure into my hobbies, but I feel SO MUCH better for having done this. Getting my ideas out of my head and onto paper has cleared up brain space and made me decide what is actually a priority to me. I love having a good plan and I'm excited to get more crafting done the rest of this year! If you made a Making List, what would be on yours?

Summer of Basics FO #2

I have been planning to make a Wiksten Tank for over a year now, and I finally finished it up!

I made the dress version as a muslin a year ago with some stash fabric I already had--another cotton, but a lighter, floatier cotton than this fabric (by Rae Ritchie from the Desert Bloom Collection.) I found there was too much fabric in the upper back with that muslin, so on this version I took about an inch out of the upper back simply by angling the placement of the back when cutting it out, as described here. I cut a size S, based on my muslin and my old bust size of 33". TMI: Since then I've switched birth control methods and my breasts have grown a little, so I'm more like a 34" now. I discovered this fact when I found the bust area too snug once I tried my tank on! I wound up unpicking the top third of the French seams and redoing them with smaller seam allowances so I would have enough room in my bust area.

I decided to lengthen and widen the armholes based on my favorite Madewell tank top, since I found them too tight for my liking. I just laid that tank top over this one, traced the new armhole lines and trimmed the excess fabric off. It wasn't a lot, maybe 1/2-3/4" at most at the bottom of the armhole, but it did change the curve slightly in a way that better accommodates my arms/shoulders, or at least my fit preferences for that area! I had to add some extra fabric to the bias facings for the armholes to accommodate the new dimensions, so I fudged it by adding a little piece onto my existing bias strip rather than cut a whole new one because I'm lazy, and it's going in my goddamn armpit anyway, who cares! I followed this Grainline Studio tutorial for the arms and neck since I was having a hard time understanding the Wiksten directions.

However, I have some issues with the overall finished product that I THINK is due to my material choice, but I'd love to hear advice from more experienced sewists on it. This cotton was listed as being fine for quilting and apparel, though after reading up on the 'can quilting cottons be used for garments' debate that I was unaware of, I suspect that this cotton would be better suited for more structured garments and not a floaty tank top. It's funny--I'm so comfortable with yarn choice that I don't question myself in that area, but now I'm realizing how unfamiliar I am with fabrics and that I need to be extra careful in buying online!

You can see below how the tank fits decently (I think...) in the upper back, but the extra fabric in the body due to the A-line shape just pools weirdly due to the stiff cotton rather than flowing away from my body. That's the fabric's fault, right? Right?!

If you look back at the top photo, the bottom center of the neckline tends to flip out a little. Not sure what causes that!

Another mystery to me is the below issue. When I'm moving around and not adjusting the garment, tugging it down, etc, it creeps up and I get the armhole gap and raised shoulder/back neck as seen on the left. On the right is how it fits when I adjust it back down.

I have to admit, I really loved this print so I'm bummed this isn't the tank of my dreams, but I've convinced myself (rightly or wrongly!) that it's simply a bad fabric choice for this garment and not due to my newb sewing skills, so I've accepted the flaws. It looks fabulous with a cardigan on though! I'm looking forward to trying the Wiksten Tank again with a more drapey fabric, and would love to hear from you all about your tank fitting wisdom.

Summer of Basics FO #1

I knocked out my first item for the Summer of Basics Make-Along on Day 1!

To test drive Fancy Tiger Crafts Fen before starting my dress version, I used stash crepe de chine to try to the top. I was ok with this turning out totally unwearable, since I'm not too attached to the fabric. Luckily, it worked beautifully and I really like this top!

My body measurements put me at a size 4, and since I wanted all the ease in the top I cut the size 4. For the dress version, I'm thinking about sizing down to a 2 to have less ease in the waist. Has anyone successful sized down in a Fen dress for a closer fit?

I did struggle a little with the slippery fabric, and cutting out the bias strip for the neckline in particular was a pain in the ass. I don't have a cutting table, chalk or a rotary cutter so my method is to pin the pattern pieces directly to my fabric and cut them out on my living room rug with my old scissors that probably need to be sharpened. If I don't lose interest in sewing again, I'll definitely be looking into upgrading that process with some shiny new tools!

I didn't finish the seam allowances. I intended to zig-zag stitch them, but the fabric hated that idea and I didn't have enough room to do a clean finish. I plan to handwash it at least, which I'm hoping will slow down any fraying.

Here's to my first sewn garment in about three years!

Handmade Summer Wardrobe Plans

Now that my wardrobe has been assessed (see previous post), I can talk about the projects I have planned for my summer wardrobe refresh/Summer of Basics Make-Along! My main priority is sewing, since I do have some knitted warm weather tops already, so let's jump into those first!

I am DETERMINED to finally make my planned Wiksten Tank! I purchased this Rae Richie Desert Bloom fabric from Drygoods Design OVER A YEAR AGO. I made the longer, dress version as a wearable muslin and I think I ran out of thread in the middle of it, plus hated the way the dress looked so I didn't finish the neckline. But the dress showed me that I will need to make an upper back adjustment and take out some extra fabric there. I've never altered a pattern like that before and I'm a little nervous!

I'm trying to use up some of my existing fabric stash to avoid waste and to get back into the sewing groove before treating myself to some fancy new fabric. I bought this crepe de chine from Girl Charlee Fabrics...I think in 2014?! I'm not sure what the hell I had planned for two yards of this monstrosity, and decided to make a Fen Top as practice for the next project. I don't love this print now, but I'm hoping it will be cute as a small dose in this drapey top.

And THIS is the project I'm most excited for--a Fen Dress in Railroad Denim from Fancy Tiger Crafts! I'm thinking about putting the stripes in opposite directions, like running vertically on the top and horizontally on the bottom. Or maybe the other way around! (Thoughts on that?)

I have other, more nebulous plans depending on how I feel, but these are the three definites. I own a serger that I don't know how to use, and a stash of knits I have ideas for. I'd really like to serge those projects though, I'm hoping I can learn to use my serger this summer. On the knitting front...nothing definite yet! I was thinking about making a Brookfield Vest or a Tegna, but I agreed to some design work due in September and now I'm not sure what my free knitting time will be looking like.

It's hard not getting a million ideas and chasing them all. I recently read Overdressed: The Shockingly High Cost of Cheap Fashion, and while I was already aware of most of the issues mentioned in the book, it really hammered home for me that slow fashion should be SLOW. I'm trying to get better about savoring the process, the planning and the slow making above the consumer-y glee of having another FO. The feelings when completing a handmade garment are of  course deeper and more meaningful than purchasing something from the store but in the end, I don't want my end goal to just be the acquisition of more stuff. I'm concentrating on:

  1. Using the stash I already have; ie that bright crepe de chine. My fabric stash is small, so I don't have a lot of fabric I dislike that I need to utilize before I can buy fabrics more suitable to my current needs. (I have vague plans for most of that fabric, actually!) On the yarn front, since leaving Webs I don't buy yarn quite the way I used to and I have a stash I'm very, very happy with!
  2. Repairing and wearing the clothes I already have. I have a tendency to channel my inner frustrations into my wardrobe sometimes and take it out on my clothes, accusing them of making me look too old/young/frumpy/sexy/etc. As I get older, I have more positive days than negative overall re: my body and body image, so I'm trying to get myself to chill out to get through the bad days instead of letting the frustration send me to buy new jeans. New jeans don't magically fix everything!
  3. Paying attention. That means paying attention to how I feel in my clothes, what I feel is missing from my wardrobe (and how much I actually would use it vs the fleeting urge of wants), and enjoying the process of making. I'm no longer interested in making things for the sake of the final thing if I find the process itself unbearable.


Handmade Summer Wardrobe Assessment

Getting dressed during warm weather is always a struggle for me. I feel underdressed and un-stylish if I'm not wearing multiple layers, making the classic summer uniform of a dress + sandals or shirt + shorts feel blah. I also feel like I have more fit issues in summer clothing--but it's more likely that fit issues become more apparent the less you have on! An ill-fitting shirt can be covered up by a bulky sweater come cooler temps, but no such luck in the summer.

These feelings, coupled with the fact that my handknit wardrobe leans towards cold-weather coverage, has led me to focus on planning some summer clothing projects. My hope is that by integrating more handmade pieces that I love into my warm-weather wardrobe, I'll be more excited to get dressed in the summer. I'll be playing along with the Summer of Basics Make-along, plus likely embracing a few extra projects. Those project ideas will be discussed in my next post. Up first: taking stock of what I already have and what's in progress!

From L to R: Holla Back Tank, linen tee, Sugar Maple, Nachfalter

From L to R: Holla Back Tank, linen tee, Sugar Maple, Nachfalter

Honesty time: I'm not sure how much I will actually wear these, but I'm going to make a strong attempt (a la EmSweWeMo) and take stock at the end of the season of what got loved and what didn't. I've started rotating a selection of my handknit garments into my dresser, since the bulk of them live under the bed in storage containers and thus are always out of sight. By choosing 3-5 pieces and keeping them close at hand, I've found myself wearing them more often. 

Interestingly, two of these pieces I didn't knit myself, proving my lack of attention to this seasonal category of knits! The linen tee was from a friend's handknit wardrobe (she didn't want it anymore), and I think is knit in Rowan Linen. It was a very timely acquisition, as I'd been planning to make a simple stockinette linen or linen blend tee at the time! And Nachfalter is the original sample from Holla Knits, Allyson was culling her handknit wardrobe and I asked for it.

Tellingly, the piece I'm most excited to wear is the linen tee since it's easily the most versatile. The length, fit, and/or color of the other three pieces dictates that I can only wear them with certain bottoms. (They're also all done in wool or wool blends.) I realized this last summer, which is why I started knitting a basic grey Choose Your Own Adventure Tee in Quince & Co Willet.

Finishing this languishing WIP with time to wear it this summer is my goal! It's also my only cotton knitting, so I think this will get much more usage than the three wool/wool-blend tops in my summer wardrobe.

Next week I'll share my Summer of Making plans and my future handmade summer wardrobe goals!

How to Shop at Webs--America’s Yarn Store

Here’s a not-at-all-secret fact you might not know about me—I worked at Webs for almost seven years in various capacities.

All photos in this post © Webs/yarn.com

All photos in this post © Webs/yarn.com

Webs is a huge destination for many in the fiber community, and I saw countless stunned, amazed, and overwhelmed reactions from first-time customers during my time working there. Part of that was spent working the retail floor, so I’ve lived through multiple Tent Sales, busy Saturdays, holiday shopping seasons and regular old weekdays! If you’ve never been to Webs at all, or if you’ve shopped there before but never during a big sale, keep on reading for my insider’s perspective on how to shop America’s largest yarn store.

The front half of the retail store.

The front half of the retail store.

The Basics: Skip this part if you’ve been before!

  • The retail store is in Northampton, MA. If you’ve ordered online before and saw Easthampton, MA printed on your invoice—that’s the shipping warehouse. Don’t go to that address hoping to shop!
  • The front half of the store is full-priced items, most of which are eligible for the Webs Discount.
  • The back half is known as the warehouse, and that IS shoppable and is different than the shipping warehouse. (Yes, confusing nomeclature.) The warehouse is full of Webs’ own Valley Yarns Line, and yarns marked down in price like closeouts and discontinued yarns, occasionally overstock and so on.
  • Bathrooms are in the front of the warehouse.
  • A few years ago the store started printing ‘store maps’ that are near the front door. Since the store and warehouse are (mostly) sorted by weight, this points you in the general direction if you already know what you need. See what these maps look like here.
  • To work in the retail store, staffers must have fiber knowledge and preferably multiple disciplines. So don’t hesitate to ask them questions! Depending on the day of the week, you might get unlucky if say, you have a complex weaving question and the staff members who weave aren’t working that day, but generally there is good coverage for most questions.
The back half of the retail store, or the warehouse as its called. Yes, it's shoppable!

The back half of the retail store, or the warehouse as its called. Yes, it's shoppable!

Hack: Stop at a bathroom before hitting the store.

Especially during busy sales or weekends, don’t get stuck waiting in line for the bathroom when you first arrive—stop right before you reach the store! If you’re coming from I-91 North or South and get off at Exit 18, there’s a gas station with a Dunkin Donuts on your right before you reach the turn for Service Center Road. You can also stop at that gas station if you’re coming up from Holyoke on MA Rte 5/10. If you’re coming down 5/10 from Hatfield, you’ll pass multiple gas stations and fast food places before you hit the main intersection of downtown Northampton.

Have a plan.

How prepared you want to be is up to you. I suggest bringing a list that at the very least reminds you of projects you’d like to work on or gaps in your stash, ie ‘yarn for Tea Leaves Cardigan and Color Affection’ or ‘purple fingering weight yarn.’ This can keep you in check if you’re on a budget and become intoxicated by yarn fumes, or if you get overwhelmed easily and forget what you need. A more thorough list of specific yardages is helpful, especially if your pattern calls for a yarn that is no longer available, a little known indie yarn, or a yarn that Webs doesn’t carry. Telling a staff member you need 1000 yds of DK weight yarn for a certain type of project will get you to the right shelves faster. Knowing the names and colors of yarns you’ve been eyeing online is even better! If you can bring your pattern with you, whether it's on paper or your tablet/phone, that can help shortcut things.

Tempting shelves of Madelinetosh!

Tempting shelves of Madelinetosh!

Hack: In-Store Pickups

If you know you HAVE TO HAVE a certain yarn, I suggest ordering it in advance with an In-Store Pickup. In a nutshell, Webs has both a physical retail location (in Northampton) and a shipping warehouse (in Easthampton), where the bulk of inventory lives. The website displays the total amount of inventory for an item, meaning there’s no way for you to know how much of that total will actually be in the store when you arrive to shop. Ordering an In-Store Pickup guarantees that yarn will be in the store, reserved for you when you arrive so you’re not disappointed. You can read the guidelines on Webs’ FAQ page (note there’s a lead-time). I would place an ISP if your order falls into one of these scenarios:

  • The total amount in inventory is close to the number of skeins you want (ie, inventory says 7 and you want 5.)
  • You want a large quantity in one dyelot, like for a sweater or blanket project. Especially so if you are looking at hand-dyed yarns!
  • The yarn is limited edition, a closeout, or otherwise a one-time-only, get-it-while-you-can scenario.

You can always place an order in the store at checkout for any missing or out of stock yarn to be shipped to you when it arrives, but you know…then you have to wait.

When to shop.

This is not a hard and fast science, since you never know who will show up! To avoid crowds try to shop on weekdays and in the middle of the day. If you must shop on a Saturday or during a sale, I’ve noticed crowds tend to thin around lunchtime as people leave to grab food, so if you can wait and pop in then you’re likely to have more elbow room and less competition for that skein you’ve been eyeing.

If you're planning on traveling from out of the area and are looking for local accommodations, consider checking the calendars of Smith College, which is located right in Northampton, and the other four colleges in the area before planning your trip. Rooms can be hard to find around graduation, which frequently overlaps with Tent Sale, and during other big events of the year. Also note that Webs isn't too far from Rhinebeck, so many people will duck into the store on their way to or from their Rhinebeck weekend causing some extra traffic on those dates.

These are the tents of Tent Sale.

These are the tents of Tent Sale.

Expert Level: Tent Sale.

The annual Webs Tent Sale is a weekend event that occurs in May as part of the extended Anniversary Sale. This year it's May 20 & 21, 2017. Along with yarns from the Anniversary Sale that are already on sale, lots of special deals get put out under big tents in the parking lot. Stuff like a bag of yarn for only $10! It’s a really big deal—bus loads of knitters will field trip to the store on Tent Sale Saturday! If you have a chance to come to the store on a regular day first to get acquainted with the layout, that will help you navigate more easily. Saturday is the most popular day, since it’s the only day of the weekend that includes the Fleece Market of independent vendors selling their wares in the parking lot. To survive Tent Sale:

  • Go to the bathroom before arriving. Really. The women’s bathroom at Webs only has three stalls and the men’s bathroom is single-person.
  • BYO water or beverage of choice.
  • Bring a well-planned list so you can be as self-sufficient as possible. There’s not enough staff to go around, especially in the morning, and you’ll save time if you can find things yourself rather than having to wait behind 10 other people to ask a staff member.
  • Tent Sale is an all-hands-on-deck event, so there will be Webs staff from the warehouse or other departments working who are not fiber crafters and don’t know where anything is. Be patient with them! This is also not the weekend to ask for intricate, hands-on help with your projects in progress as there are just too many people attending.
  • If you can arrive slightly before or right at opening, you can get directed to a parking spot faster and be ready to spring as soon as things get going. There is usually a very narrow window at the beginning of Saturday where things are easily navigable, and then it’s a madhouse until early afternoon. Before then, the line to checkout stretches the length of the store and back into the warehouse!
  • Unless you really, really want to have first crack at special deals or want to shop the Fleece Market, I’d say come late afternoon on Saturday or wait til Sunday for less chaos.

Have you shopped at Webs before? What's your favorite tip for a newcomer?

Examining Bottom Up Set-In Sleeve Construction

If you listened to Episode 49 of the SweetGeorgia Show and shared their befuddlement on my design Ribbons and how the upper body is constructed, this post is for you! 

Bottom up set-in sleeve sweaters are my absolute FAVORITE way to work sweaters in one piece, but with the popularity of top-down knitting this method seems to be unfamiliar to some. (Other designs of mine worked this way include Turners Falls Cardigan, Polonaise Cardigan, Cables 'n Cats, Kitsunetsuki Cardigan, and Praline Pullover. Can you tell this method is my absolute favorite?!) I like this method for a few reasons. As a designer, my brain groks it much more easily than top-down sweaters and I can write and grade these designs across multiple sizes without knitting them myself. (Ribbons was knit by one of my awesome sample knitters, Joni.) As a knitter, I like getting the big, boring chunks of knitting out of the way first by completing much of the body and sleeves before finishing with the more interesting yoke. And of course, you get the bonus of attractive, well-fitting sleeve caps that have the appearance of set-in sleeves without requiring any seaming!

My drawing skills aren't the best, so here's my attempt to better illustrate this construction method for you. 

To reach the point shown above, you'll knit the body from the bottom up until the body reaches the underarms. For a cardigan, the body is knit flat; for a pullover, the body is knit in the round. On the last row or round, you'll bind off or set aside some stitches located under the underarms. This is so you can seam or graft the underarms closed once the sweater is finished. After that, put the body aside and knit the sleeves in the round from the cuff until they reach the underarm as well. Like with the body, you'll be binding off or setting aside a few stitches where the underarm is located before continuing. You now have one body and two sleeves...time to combine them!

(I reused scrap paper so apologies for the text showing through a little!) This step is the most fiddly and it's helpful to use a longer circular needle at first to accommodate the large number of stitches all at once. From here on out, I'll be speaking as if you're knitting Ribbons (or a cardigan) as opposed to a pullover, but the only difference is knitting flat vs knitting in the round. Otherwise the concept is still the same.

The joining row is worked on the RS. You'll knit across the right front of the body until you reach the stitches that have been set aside for the underarm. At this location, you grab one of your sleeves and knit across all the sleeves stitches (excepting the sleeve stitches which have already been set aside for the underarm.) Once the sleeve stitches have been joined onto the same needle as your body, you continue to knit on the body on the other side of that underarm gap. Knit across the back until you reach the second underarm gap, then knit across the second sleeve stitches to join the second sleeve to the body. Continue knitting the body on the other side of the second underarm gap, and knit to the end of the row which will leave you on the left front of the cardigan. Your work should look like this now:

Arguably, you could try it on if you wanted to but it's not going to stay on due to a super wide neckline! Now we need to shape the yoke to create the look of set-in sleeves and to ensure the cardigan becomes you know, an actual wearable thing. That will stay on.

This is the part that confuses most people, since the directions can look like a mess of decreases. It helps to remember what the armhole and sleeve cap of a traditional seamed set-in sleeve look like, since we're going for the same effect. We're simply recreating it as a 3D shape, instead of working it in 2D and relying on seaming to transform it into a 3D item.

A shaped armhole (left) starts with a series of bind-offs followed by a section of more gradual decreases to create the curve needed to accommodate your shoulder movement. A set-in sleeve cap (right) is designed to match that armhole curve on the front and back armhole, so each side of the sleeve cap also begins with a series of bind-offs followed by decreases. You'll generally wind up doing more decreases on a sleeve cap than an armhole, since you're attempting to create a bell curve to ease the sleeve cap into the top of the armhole.

How does this translate into Ribbons? The instructions look something like this:

  1. Decreases are worked only on the body.
  2. Decreases are worked on both body and sleeves.
  3. Decreases are worked only on the sleeves.

The rate of these decreases depends on the design itself, the gauge, and the sizes offered, so these steps might not all be followed if enough decreases can be satisfactorily completed in another step. For example, my Turners Falls Cardigan is worked in bulky yarn and I went straight to Step 2 for the yoke decreases since I had far less stitches to work with and didn't need to perform decreases only on the body.

When all yoke shaping is complete, you wind up with:

  1. A small amount of sleeve stitches.
  2. Stitches on the fronts equaling the intended shoulder width.
  3. Stitches on the back divided into three zones: the back neck, and stitches on either side equaling the intended shoulder width. These side zones should contain the same number of stitches as the fronts.

You finish off by working 4 short row sections. The first shapes the right front shoulder while slowly eating up some sleeve stitches to create that rounded top of the sleeve cap. The second section shapes the back right shoulder and eats up the rest of the right sleeve stitches. You repeat this process for the left side, so you're left with equal sets of stitches on the front and back for each shoulder. Then you graft, 3 needle BO, or seam to join the shoulders, and graft or seam the underarms closed!

The end result?

A beautiful, wearable cardigan with flattering, well-shaped shoulders and sleeves!

Are you ready to conquer a bottom up set-in sleeve sweater now? Let me know if you enjoyed this post and want to see more technical content from me!

Bijou Basin Ranch Himalayan Trail Review

Disclaimer: I was sent a skein of Himalayan Trail for free in exchange for this review.

Bijou Basin Ranch's Himalayan Trail was my first experience knitting with a yak-based yarn. As a former yarn-store employee I've fondled lots of exotic fibers, but haven't used most of them since I prefer to stick with yarns that promise to wear well, rather than reaching for softness. A 75% Yak Down/25% Super Fine Merino fingering weight blend, Himalayan Trail retails for $25 and nets you 200 yards for that price, putting it in luxury yarn territory for most people. 

On first glance, Himalayan Trail reminded me of some 100% Cashmere yarns I've seen, thanks to its visual softness. You know how some yarns have a strong halo? This yarn doesn't have a halo per se, but a general blurring of the edges (as if it were a photo that's slightly out of focus, if that makes sense), rather than having tightly twisted, strongly defined, crisp plies. However, once you start to work with it the yarn feels hardier than 100% Cashmere, no doubt due to the merino content. My swatch has been kicking around my office for two weeks with no visible pilling, shedding, or other such fiber malarkey.

Some yarns know exactly what they want to be, and Himalayan Trail is one of those yarns--lace, lace, lace! I tried a stockinette and brioche swatch for kicks, but didn't get very far on either one because it well, felt wrong for this yarn. Knitting lace with Himalayan Trail was a joy and it blocked very crisply with only a steam block.

Note that the color in the photo above is not true to life, I edited the desk shot with an emphasis on high contrast and strong, saturated colors. I'd say the other photos in this post are truer to life. This is Pistachio, and it has a subtle, slightly under-saturated look to it, with shifting bands of color thanks to the hand-dyeing process. Bijou Basin dyes a range of colors in-house (like this one) and frequently collaborate with indie dyers for limited edition offerings.

At only 200 yards, your pattern options are limited to smaller accessories for a single-skein project. I particularly like Collister by Kirsten Kapur (top) or Straightforward Mitts by Mone Dräger (bottom).

Untitled design (8).png

What would you make with a single skein of Himalayan Trail?

Brioche Cowl FO

In January, my good friend Kirsten gave me a beautiful skein of local wool she had hand-spun and hand-dyed. It's wooly and sheepy, but not irritating, and the resulting yarn is lightweight and airy rather than being a dense, bulky yarn.

DSC_0324-2.jpg

It's beautifully thick-and-thin, ranging from super bulky to super fine and plied with a weaving yarn. It's the kind of thing I wouldn't actively spin myself since I can't intentionally spin irregular yarns, but I love the play of color and texture! The skein was giant so I decided to knit a cowl end-to-end in the hopes of using up every last yard.

I chose brioche because it's fun to knit, I don't have many brioche accessories, and I thought it would play nice with the yarn's varying thickness without having to settle for garter stitch. Not that I hate garter stitch, but sometimes you want something more interesting! I cast on provisionally and knit on a US 10.5 needle until the strip was long enough to loop around twice, blocked it flat, then twisted it intentionally and kitchenered it closed. Surprisingly, I didn't use up all my yarn! I think I have enough left for a pair of super simple fingerless mitts, or at least that's what I'm hoping for.

I'm anal-retentive enough that I didn't like how the edges waved in-and-out when the yarn had a particularly thick or thin section. I wet-blocked it using blocking wires along the edges and stretched it to the max for this more open fabric, and in hopes of getting nice straight edges. The edges looked great when I took the cowl off the board but after a few wears the yarn is back to its original wildness. Life blocking lesson: don't fight the yarn. I KNOW this but I also like to see how far I can push the rules ;)

This was a really satisfying, quick knit and it's a great addition to my cold-weather accessory wardrobe. The teals and blues go with a lot of my clothing and I like how versatile long cowls like this are, with the choice of leaving it open or looping it double. Thank you so much for the yarn, Kirsten!

New Designs: Seismite & Ribbons

I know I hinted at less designs...but these were completed awhile ago! Such is the nature of the biz, us designers are always working months in advance so I'm not necessarily busy when releases finally come out.

First up is Seismite, a fun and free hat pattern I released earlier this month. If you'd like to snag this one, just sign up for my weekly newsletter to receive it.

Photo by Lindsey Topham

Photo by Lindsey Topham

I dyed the yarn myself under the tutelage of the Kangaroo Dyer and this project is perfect for it! It was my first attempt at dyeing a speckly yarn and while the speckles aren't as pronounced as the skeins I've seen from official dyers, I'm pleased with the watercolor effect I wound up with. I only used up half the skein, leaving me with enough yardage for a second Seismite or some fingerless mitts.

I also contributed a cardigan to SweetGeorgia Yarns' Spring with SweetGeorgia Vol. 2 collection for spring. Meet Ribbons!

Photo by SweetGeorgia Yarns

Photo by SweetGeorgia Yarns

This long stockinette cardigan features graduated stripes of eyelet texture along the hem and cuffs, allowing you to play with fun color combinations! The set-in sleeves are shaped with decreases since you work everything in one piece from the bottom-up, which means no seaming. It's a simple, easy-going silhouette that works with jeans or a dress. I wouldn't wear it with this dress, I was only taking a modeled photo to share with my sample knitter Joni!

On Designing Less & Knitting More

A few months ago, I made a conscious decision to take on less design work. As I get older I find I want more time to myself and I care less about growing my business. That's not to say I'm giving up on designing, but I've become more and more content to do this my way, at my pace, rather than worrying about what I need to do to become the next big thing. Working full time once again has forced me to face my limitations and accept them.

Back in 2012-2014, I was working full time and spending almost every night and all weekend knitting samples. If I wasn't going to finish something in time, I forced myself to stay up late knitting it. I passed on events and time with friends unless they were going to come over and hang around while I knit. I remember going back home to visit a friend from high school and I was working on the Heliopath Vest. I sat in the middle of a party knitting it while everyone else around me was doing shots. (I mean, I did some shots too...but I made myself complete a chunk of knitting first! No drunk deadline knitting allowed!)

Honestly, there were times in that era when I HATED knitting, despite how much work I was accomplishing and how hopeful I was for my burgeoning design career. I told myself I had to stay on the grind and the next release would be it, I would reach the next level of exposure....then it was oh well next year it will happen....then it was if only I had more time to work on my business... 

Since then I've slowly gravitated towards using sample knitters, which has been a huge boon on my productivity and my sanity levels. I love my sample knitters! But even when I first started to use sample knitters, I was still taking on too much work. I have some designs I'm not proud of, because I know I could have perfected them if I had more time and wasn't as overburdened. I hate that I have work in my portfolio that makes me feel that way, and I want to avoid that from happening.

I've been talking a long time about slowing down and working less and finally, I feel like I've put that into practice. I'm relying on my awesome sample knitters to help me out for those third-party submissions that really speak to me but otherwise, I'm sitting those submission calls out. The FOMO is hard, really hard! But instead of working on 5 designs at once, I'm working on 2 or 3 and only knitting actually one of those, and there are plenty of stretches where that one design is the only thing on my plate. It's leaving me plenty of time to focus on other things in life that matter to me: spending time with my honey, exercising, cooking new things, and oh yeah--selfish knitting!

So I guess the point of this is...2017 might look different here. More FOs, and less releases. I'm ok with that though.

My two current selfish WIPs

My two current selfish WIPs