kangaroodyer

A Tale of Two Socks

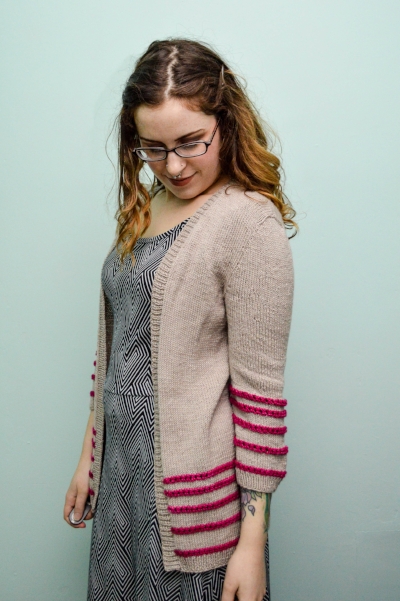
Last post, I told you about my making list and the projects on it. Here's to my first FO from that list, the Saturday Matinee Socks!

I started these last summer and was about halfway through the first sock...so while it obviously took me a long time to get BACK to this project, once I buckled down I was able to crank them out pretty quickly. I don't consider myself a huge sock knitter, though I like all the pairs I've made so far. Mostly I have other things I want to make more! But I'm totally a convert to shortie ankle-style socks now, getting rid of the leg made such a difference in being able to finish these before I got bored.

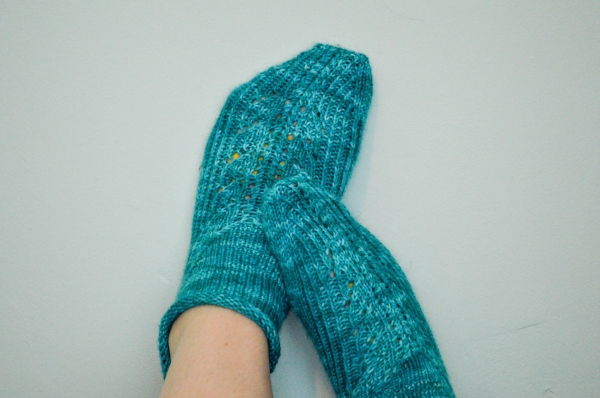
I was still in the sock groove once I finished these, so I picked up the other pair of socks on my making list, Leyburn. Spoiler alert: They are no longer Leyburns!

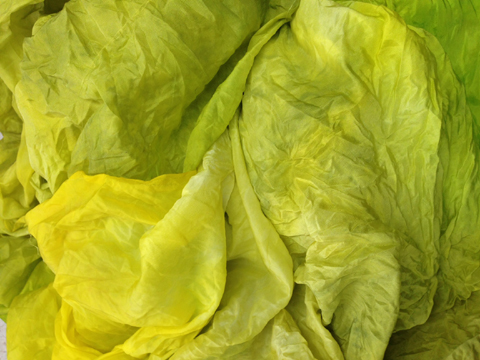
I really love how the slipped stitch design on the Leyburns works with yarns like this--which, by the way, I dyed myself during a dying session with the Kangaroo Dyer once! I just could. not. stand. the Leyburn stitch pattern, and as pretty as it looks, I'm no longer interested in making things when the process is unbearable. Partly for practical reasons (if I hate making it, I'm not going to make it and it will never get finished) and partly because I'm learning more and more that I need to enjoy the act of making as much as I enjoy the having of the finished object. 

Instead of continuing with a sock I didn't enjoy making, I ripped back to the toe and did a simple, toe-up vanilla stockinette sock. The pooling is kind of meh (I wasn't interested in playing around with my gauge a whole bunch to fix that) but they're cheerful and I'm happy to have settled on a pattern I can actually finish. Hopefully I can do something fun with the leftovers, like stripe it with white in a different pair to avoid the pooling. KNIT ALL THE SOCKS!

New Designs: Seismite & Ribbons

I know I hinted at less designs...but these were completed awhile ago! Such is the nature of the biz, us designers are always working months in advance so I'm not necessarily busy when releases finally come out.

First up is Seismite, a fun and free hat pattern I released earlier this month. If you'd like to snag this one, just sign up for my weekly newsletter to receive it.

Photo by Lindsey Topham

Photo by Lindsey Topham

I dyed the yarn myself under the tutelage of the Kangaroo Dyer and this project is perfect for it! It was my first attempt at dyeing a speckly yarn and while the speckles aren't as pronounced as the skeins I've seen from official dyers, I'm pleased with the watercolor effect I wound up with. I only used up half the skein, leaving me with enough yardage for a second Seismite or some fingerless mitts.

I also contributed a cardigan to SweetGeorgia Yarns' Spring with SweetGeorgia Vol. 2 collection for spring. Meet Ribbons!

Photo by SweetGeorgia Yarns

Photo by SweetGeorgia Yarns

This long stockinette cardigan features graduated stripes of eyelet texture along the hem and cuffs, allowing you to play with fun color combinations! The set-in sleeves are shaped with decreases since you work everything in one piece from the bottom-up, which means no seaming. It's a simple, easy-going silhouette that works with jeans or a dress. I wouldn't wear it with this dress, I was only taking a modeled photo to share with my sample knitter Joni!

Revisiting the Kangaroo Dyer

I am extraordinarily lucky to have contact with fantastic creative people every day, whether it's my coworkers at the store on a work day there, the myriad of knitters and designers I'm in contact with online, my pole dancing/circus family, or my friends. Getting out of my creative niche to explore someone else's is fun AND mentally refreshing! I've dyed with Gail (the Kangaroo Dyer) once before, four years ago--my one and only time dyeing until recently, when she invited me back in her studio for take two. Now I'm older, wiser (lol right)....well at the very least, I was more confident in my dyeing skills this time since it wasn't completely foreign! 2One of the more awe striking sights in Gail's dye studio is her large collection of orange juice containers, testament to her lifelong love affair with Vitamin C...In all seriousness, friends and students donate the containers to her so she doesn't overdo it on the OJ! Those shelves house her ready-to-go dye mixtures and the dye powders themselves are conveniently lined up behind each solution when the time comes to make a new batch.

First agenda was to dye some superwash merino worsted yarn. With the help of handy dye color cards, I picked out three colors that sparked my interest and tested them on coffee filters until deciding on the right level of saturation for each.

dyeing processThen...dyeing time! I handpainted the hanks in sections and tried to blend each color into the next to avoid any harshness.

photo 2I can't wait to use my gorgeous yarn and see how it looks knit up!

Next, Gail offered something new--a chance to dye silk fabric! I have extensive summer camp tie-dye experience but that's about it. Since I decided I wanted to pleat the silk before dyeing it, this part was somewhat familiar thanks to my tie-dye days! Gail helped me fold the 2 yards of silk and then roll it up like a jelly roll. I submerged each side of the roll in a different dye color before opening up the fabric and overdying in stripes. I then scrunched up the fabric before adding the final layer to create the dimension I was looking for.

photo 3I plan to sew with it and I've got my eye on La Sylphide (the blouse version), once I have some fun money to snag the pattern with. I love it....it's like yummy chartreusey endivey goodness!

Gail's studio is so cute. Her whole house in general is overflowing with her love of color and her work--there is yarn draping over furniture, drying on her front porch if the weather is nice, scraps of silk and other dyed fabrics on her kitchen table. I couldn't help but take a few shots of of her workspace to try and share that Kangaroo Dyer essence.

studioMy creative mojo is now working overtime!

Free Pattern: Rainbow Slip Mitts

smilehI have a free pattern for you today! These were inspired by some work I'm doing with my friend Gail, The Kangaroo Dyer. She put together these colorful mini skeins in her Poet Seat Fingering base--she calls it her 'first aid kit' for color--and gave me a batch to play with. I decided to put them to good use in this super easy pair of handwarmers! They are worked flat and seamed partially up the side to create an opening for the thumb. Rainbow Slip Mitts

Finished Size: 7" around, 4.75" long (17.80cm x 12cm)

Yarn: approx 50 yards of natural and scrap amounts of 5 colors. I used RainCityKnits MCN Fingering in Natural, and a Kangaroo Dyer Poet Seat Fingering Mini Skein Kit. This is a great way to use up precious leftovers!

Materials: US 3 (3.25mm) needle, tapestry needle

Gauge: 30 sts by 38 rows = 4" (10cm) in rainbow slip pattern. Gauge is not crucial for this project.

Using natural, CO 49 sts leaving a long tail to seam with at the end. Row 1 (RS): Slip 1, *p1, k1; rep from * to end. Row 2 (WS): Slip 1, *k1, p1; rep from * to end. Repeat these 2 rows until work measures 1.5" from beginning. Knit 1 row, then purl 1 row. Begin rainbow slip pattern.

Switch to pink (or your first color). Row 1 (RS): K1, *slip 1, k1; rep from * to end. Row 2: Repeat the last row. Row 3: Knit. Row 4: Purl.

Switch to orange (or your next color). Row 5: K2, slip 1, *k1, slip 1; rep from * until 2 sts remain, k2. Row 6: P1, k1, *slip 1, k1; rep from * until 1 st remains, p1. Row 7: Knit. Row 8: Purl.

Switch to yellow. Row 9: K1, *slip 1, k1; rep from * to end. Row 10: Repeat the last row. Row 11: Knit. Row 12: Purl.

Switch to green. Row 13: K2, slip 1, *k1, slip 1; rep from * until 2 sts remain, k2. Row 14: P1, k1, *slip 1, k1; rep from * until 1 st remains, p1. Row 15: Knit. Row 16: Purl.

Switch to indigo. Row 17: K1, *slip 1, k1; rep from * to end. Row 18: Repeat the last row. Row 19: Knit. Row 20: Purl.

Switch to pink. Row 21: K2, slip 1, *k1, slip 1; rep from * until 2 sts remain, k2. Row 22: P1, k1, *slip 1, k1; rep from * until 1 st remains, p1. Row 23: Knit. Row 24: Purl.

Switch to orange. Row 25: K1, *slip 1, k1; rep from * to end. Row 26: Repeat the last row. Row 27: Knit. Row 28: Purl.

Switch to yellow. Row 29: K2, slip 1, *k1, slip 1; rep from * until 2 sts remain, k2. Row 30: P1, k1, *slip 1, k1; rep from * until 1 st remains, p1. Row 31: Knit. Row 32: Purl.

Switch to green. Row 33: K1, *slip 1, k1; rep from * to end. Row 34: Repeat the last row. Row 35: Knit. Row 36: Purl.

Switch to indigo. Row 37: K2, slip 1, *k1, slip 1; rep from * until 2 sts remain, k2. Row 38: P1, k1, *slip 1, k1; rep from * until 1 st remains, p1. Row 39: Knit. Row 40: Purl.

Switch back to natural. Knit one row. Row 1 (WS): Slip 1, *k1, p1; rep from * to end. Row 2 (RS): Slip 1, *p1, k1; rep from * to end. Repeat these two rows once more, then work 1 more WS row. On next RS row, BO all sts in pattern and leave a long tail to seam with.

Weave in ends. Using your tail from casting on, seam the bottom of the mitt 2" up the side. Use the tail from your BO to seam the top of the mitt 1" down the side. This will leave a 1.75" opening along the side for your thumb, but adjust the length and placement of side seams as needed to comfortably fit your hand. Repeat for the second mitt (they are identical.)

IMG_1776 editedHappy slip knitting!