Playing with Color: Gilt Sweater

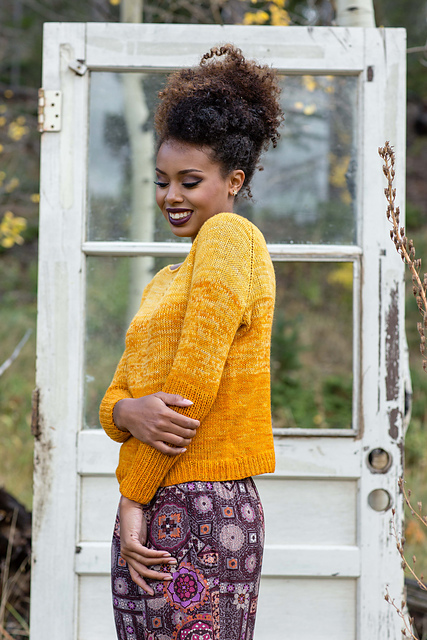
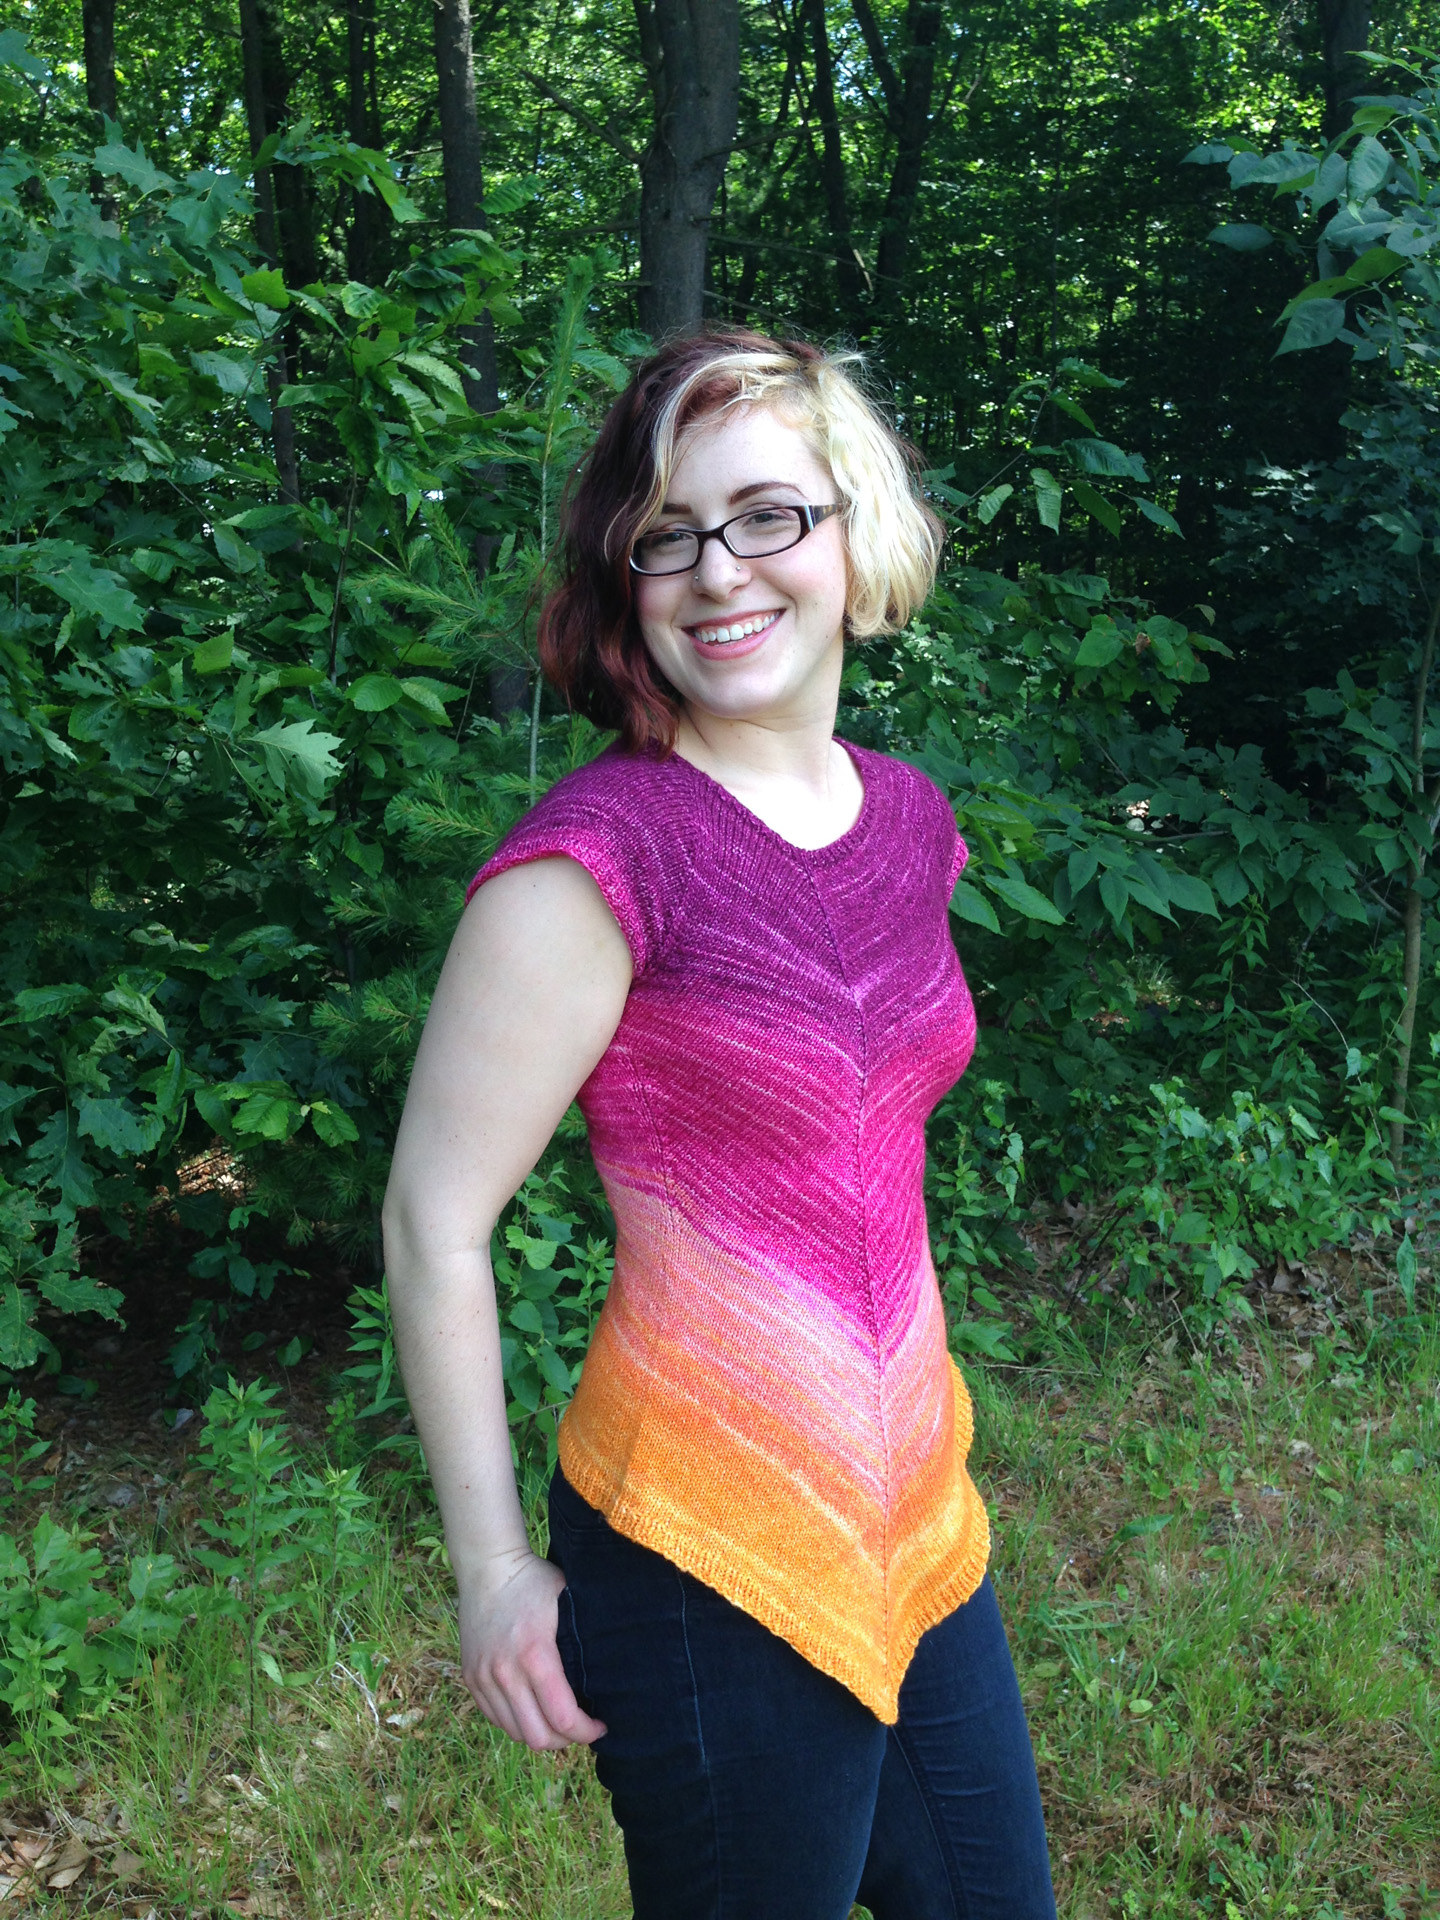
One of my favorite things to do in my part-time gig as LYS employee is to help customers pick out color combinations for multicolor projects. I feel like I have good color sense and my coworkers ask for my opinion on colors which helps reinforce this idea, even if it is all in my head! I tend to go by instinct and don't follow a strict set of rules, though I do keep the varying values of the colors in mind when picking 3 or more for a project. Since I love color, a good number of my designs feature multiple colors and as far as I'm concerned, the quirkier the better! I know a lot of people don't trust their color sense or can have a hard time envisioning a design in other colors, so I thought I'd introduce a mini series on playing with color. Each post will examine a colorful design of mine and I'll showcase some other potential color combinations that I think would work along with tips on how to approach choosing colors for that particular project. Up first is the Gilt Sweater! Since this design relies heavily on an ombre effect, you really need to pick two yarns that are closely related in order to duplicate this same effect. If you always order your yarns online, this can be really hard to do! I would suggest picking out several possible color combinations and then looking at other people's projects on Ravelry in those colors to see how the color reads across multiple cameras and lighting situations. I definitely suggest using a hand-dyed yarn to enhance the color blending, which also means that you have variation across dyelots to contend with. If at all possible, I'd visit a LYS or two and check out colors in person to find the best combination.

Let's take a look at Malabrigo Lace, the yarn called for in the pattern. Malabrigo arranges their colors by family, which really helps in choosing for this project since all the blues are next to each other, the yellows in a separate section, etc. Take a look at the blues.

blues

Often you'll see a perfect combo right next to each other, like Blue Surf & Jewel Blue, Bobby Blue & Tuareg or Tuareg & Azul Profundo (for a darker usage of Tuareg). Other times you'll want to mentally rearrange the colors to find a better pairing, but you can also do so in a computer program like Photoshop or Paint if you're having trouble seeing the two together. Stone Blue & Paris Night are separated on the website and look great together!

stoneblue parisnightStone Blue & Paris Night

Try identifying the primary hue in a color that draws your eye, and then look for a lighter or darker version of a color that carries the same hue. IE, if you're attracted to blues that lean green/almost teal, look for another blue that contains green rather than a purpley blue.

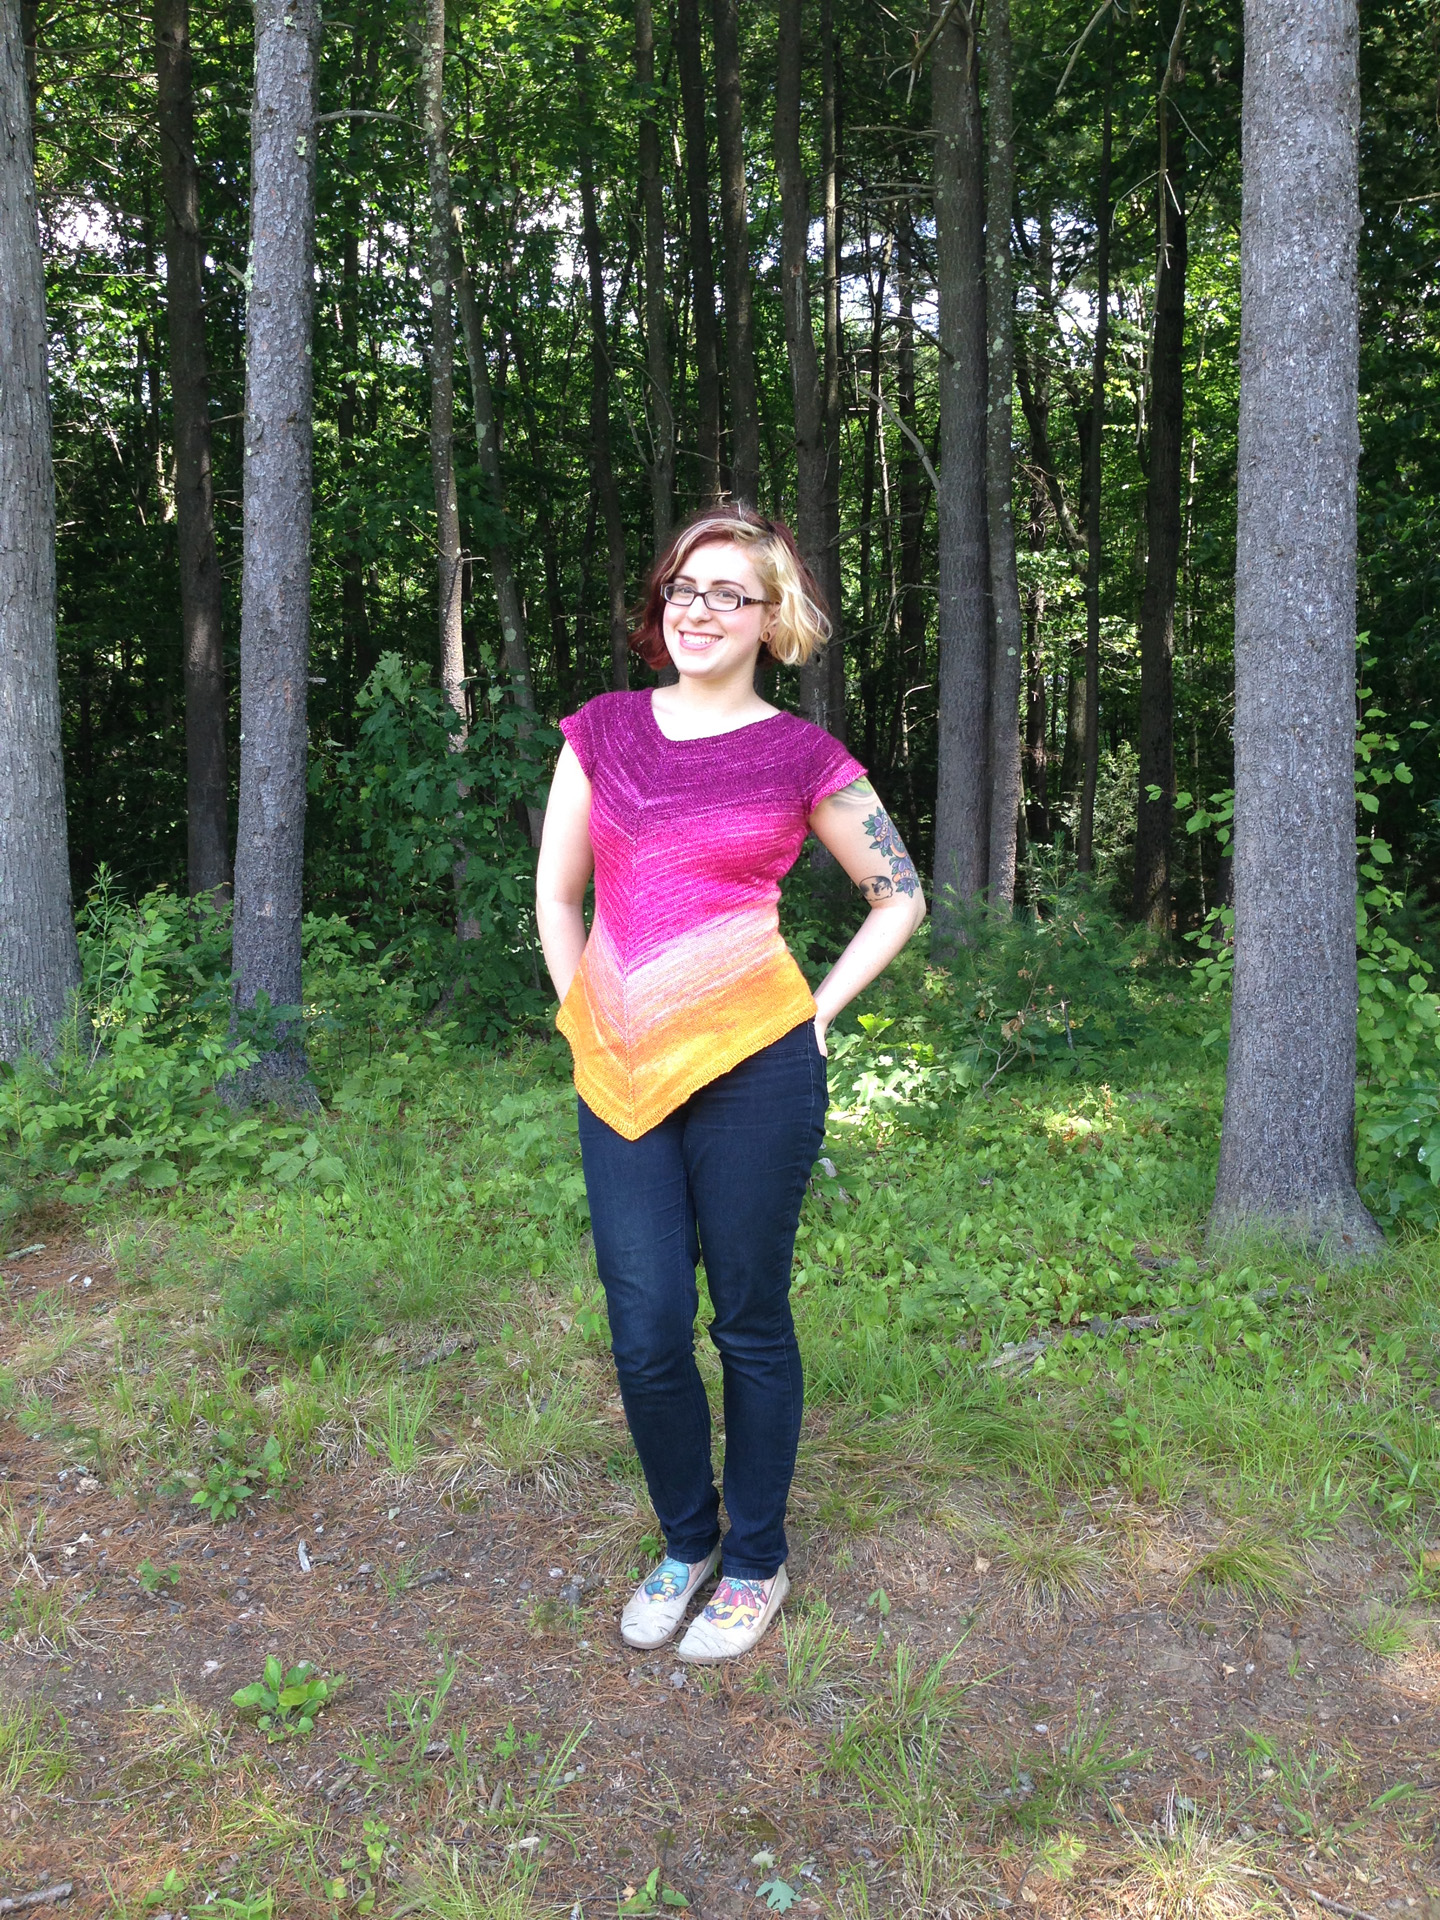
Here is a rainbow of color combinations for a rainbow of Gilt Sweaters!

apricot tigerlily
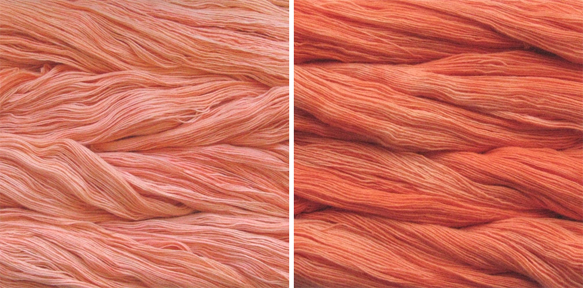
Apricot & Tiger Lily

cactusflower mollyCactus Flower & Molly

verdeesperanza cypress
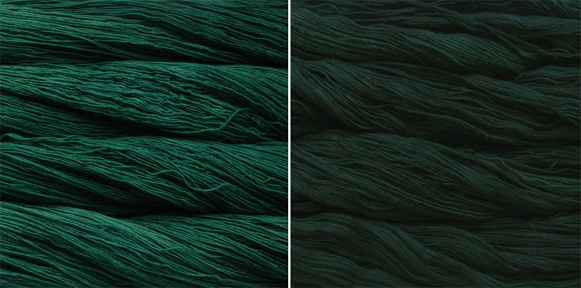
Verde Esperanza & Cypress

jacinto purplemystery
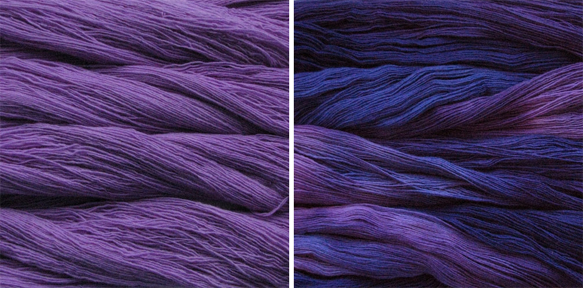
Jacinto & Purple Mystery

cognac marronoscuroCognac & Marron Oscuro

Notice that I chose the semi-solid, less crazy colors of Malabrigo. While I think you could successfully make a Gilt Sweater using a more variegated colorway and a coordinating semi-solid, it will be harder to pull off (especially without buying the yarn in person) and the end result will likely be a different looking sweater. That's ok! Just be aware of what look you are creating and swatch heavily, especially if you are trying to avoid an obvious transition line between colors.

Now go out there and show me some fabulous ombre color combinations of your own!

An Open Letter to the Fiber Factor

Dear Fiber Factor, I was very excited to hear that you were coming back for a second season. I wanted to apply for the first season, but at the time was in the process of interviews for an exciting job (that didn't pan out, as luck would have it) and didn't want to risk the two events colliding. The second season is coming at a perfect time for my career, I thought. I am a better designer now. I can work faster. I have worked within specific frameworks to satisfy clients (yarn companies) which would serve as valuable practice for the challenges. So I waited, and I refreshed your website multiple times on multiple days until the official rules for Season 2 were posted.

Unfortunately, the new Fiber Factor is no longer advantageous to an indie designer. I realize that you are in this to make money (as Skacel), and you needed to adjust the process to create more revenue for yourself. It's a business and I get that. But I am also in business and I need contracts that respect my needs and my ability to make money. I saw that you responded to one knitter on Twitter who expressed dissent and asked her what she thought the contract for the winner should include. This is my perspective as a designer.

I think putting the challenge patterns on Ravelry is a great, fresh idea that helps the designers get more attention for their participation in the competition and helps you by catering to the wishes of the viewers. However, I feel that you have greatly underestimated and undervalued the time and effort it takes to prepare a pattern for purchase. Writing and grading a pattern alone takes hours, and that's before the knitting even starts. Then of course, you are requiring financial investment on the part of the designer by requesting that the contestants cover the costs of tech editing and photography (unless the contestant is already a skilled photographer and can photograph their own work, but not all of us are so lucky.) Tech editing and good photography are essential investments that drive pattern sales and help preserve a designer's reputation for quality patterns, so it's best not to skimp here. If you're not the one person to win $500 per challenge, you might be able to win $100 but depending on the rates one receives from their editor and photographer, that $100 might not result in any profit for the designer after those expenses. And we are doing this all for 20% of sales for the majority of 18 months? The only arrangement I currently know of where a designer agrees to 20% of sales is one of the digital revenue options with Interweave--and the designer has already received a flat fee for first publication rights AND can sell the pattern themselves at the same time as they receive the 20% of sales made through Interweave's digital store.

The grand prize for the winner of the competition is a $10,000 design contract which sounds generous until it's broken down. $500 per design, for 20 designs to be completed in 20 months. Now I have little issue with the first half of that statement, since $500 per design is in line with current fees for garment first publication rights and is more than is usually paid for accessories. (Though I assume you are keeping all rights in perpetuity, which is a slightly different game and thus worth more.) 20 designs in 20 months...is almost laughable and a little insulting. If I was able to work at that rate, I would probably already being doing so for myself wherein I keep 100% of the profits. Many of us are indie designers because we WANT to be indie! I'm not interested in working at that pace which is why I work for myself and not someone else. That timeline may be the norm for yarn companies' in-house designers, but those individuals are getting paid a full salary with benefits in return for producing large quantities of designs in a condensed timeline. $10,000 doesn't wind up staying $10,000 after self-employment taxes are paid, after all. Assuming the designer knits all of the 20 design samples themselves, they likely won't have much time to focus on producing for their own business in this time period. The alternate option is to hire sample knitters which cuts further into that $10,000.

Essentially, the competitors (and then the winner) will be putting their personal businesses on the backburner to enter this competition. Do you think your terms are worth that sacrifice? 9 months is a long period of time to not produce work; 29 months is even longer. The promise of exposure alone has no proven financial value, whereas indie designers have noted multiple times that more designs=more sales, new releases=more sales (of the new release and older work.) I can't imagine that seasoned indie designers--the type of talent you want in your competition, the type of talent that already has fans, an Internet presence and can create amazing designs--will be interested to enter. How many of the Season 1 contestants would be willing to accept these terms? I'd be interested to find out, wouldn't you?

Fiber Factor, I hope you can take this as constructive criticism and maybe think about how you can improve this season to make it equitable for all: designers, viewers and yourself. I trust that a better balance can be reached.

Respectfully,

Emma

Golden

The Spring 2015 issue of Knitscene will be out shortly and I have two contributions this time around. One is a fun article about warm-weather knitting projects and the other is the Gilt Sweater.

Gilt-Sweater_medium2All photos by Knitscene/Harper Point Photography

This was sparked by the 'golden' color story on the mood boards. As I've mentioned before, sometimes I have ideas that just come to me rather than being drawn from specific photos or references and this sweater was one of those lightbulb ideas. I wanted to create a relaxed layering sweater, a transitional piece that was cozy like a sweatshirt but a little more refined. Hence my working title--Luxe$hirt! I think I said to Amy in my proposal that 'the $ is like Ke$ha', ha. It also explains my seemingly random designer blurb at the end of the pattern. I've been having fun with writing those lately, and I at least laugh at myself even if no one else finds them funny!

comboThe most striking part about the sweater is the gradient color transition, made possible by two gorgeous colors of Malabrigo Lace held double. The bottom is two strands of Color A, the middle is one strand each of Color A & Color B, and the yoke is two strands of Color B. It created a super luxurious fabric that's warm without being heavy--like a golden cloud! Extra deep ribbing on the sleeves, a boxy cropped fit and the raglan sleeves are all meant to keep it casual and sweatshirt-like. The small lace detail at the collar is supposed to mimic old school sweatshirts with the triangle insert at the neckline.

Knitscene-Spring-2015-Golden-0068_medium2The styling and setting for these photos is super cute and I couldn't be happier!

Cats Cats Cats

As promised, the second sweater from the caboose photo shoot: Cables 'n Cats!

IMG_1215 (2)smPhotos by Lindsey Topham

This sweater has no particular inspiration, which is how I work sometimes. I was playing around with juxtaposing various cable and texture patterns together and fell upon this combination which I really liked. It's a classic, simple shape overall but very flattering thanks to the waist shaping and the large cables which sit at a princess seam orientation. And then you turn around to reveal....cat buttons!

IMG_1353smestThe sleeve cuffs are also buttoned and each button features a different kitty! I love this style of buttons--I used them in my Brooklyn Bridge Mitts, and I have robot buttons in my stash waiting for the perfect sweater.

blogThe construction is a little interesting towards the end, but nothing crazy complicated. The body is worked in the round until the armholes, then the sleeves are worked separately (also in the round) and joined together with the body to work the yoke in one piece....at first! Once stitches are bound off at the center back for the button placket, the yoke is worked back and forth in rows. Then as the neckline shaping begins, you work back and forth on one side of the body at a time (going from the front neck across the shoulder to the center back.)

You can snag Cables 'n Cats on Ravelry now for $7.00.

Let's Get Stripey

I recently released a new cardigan pattern....and never posted about it here. Oops! In case you missed it on Ravelry, this is Stripe Quartet!

IMG_1598smallestAll photos by Lindsey Topham

Knit in four colors of the gorgeous Baah Aspen, Stripe Quartet is a top-down raglan cardigan that lets the stripes take center stage. There are a few special touches, like eyelet raglan increases and a curved hem finished with an I-cord bind off.

blog

I was super excited to finally use this location! I am constantly making note of potential photoshoot locations and I had mentally bookmarked this one ages ago. These amazing blue cabooses reside just behind Green Valley Produce, a farm stand in Deerfield, MA. The owner Jon was nice enough to allow us to shoot there and I have another sweater coming soon that we took photos of here as well.

I'm a huge fan of orange and pairing it with hot pink and greys was a dream color palette for me. What quartet of colors would you get stripey with?

Pole Antics

For those of you new to this blog, I pole dance. I'm not a stripper, meaning I don't pole dance to make money and I don't remove articles of clothing while dancing with the intent of becoming partially or fully naked. (Some lovely acts involve costume changes while dancing, hence the 'naked' qualifier at the end.) That aside, there are plenty of similarities between what strippers do and what I do, and it would do them a huge disservice to pretend that I am 'better' than they are--because I'm not. Pole dancing in any situation is an extremely athletic act, and many modern moves were born in strip clubs rather than being adopted from Chinese pole or mallakhamba. I have nothing but respect for strippers--hanging from one knee is difficult enough, let alone having to do so while wearing 6" heels and possessing the customer service skills of a waitress or hospitality industry person! Anyways, that's not the point of this post but I felt it needed to be said. I understand the impression most people have of pole dancing though and I'm not offended if you are uncomfortable with it--feel free to skip my pole posts! I'm performing in a Halloween showcase in a week, alongside many other lovely ladies and I just had to go full throttle...by making my own costume! Today was our dress rehearsal so I snagged some photos afterwards.

pole costumeArmed with this great printed spandex from Spandex House, my favorite source for stretch fabrics, I immediately went back to my comfort zone of sewing--aka, making shit up. There are a few practical considerations for making a pole costume, primarily in terms of coverage. Obviously I wanted something secure enough that it would stay on as I spin and invert, but you also need a certain amount of skin exposed to ensure better contact with the pole. Your knees and inner thighs are used while climbing and sitting on the pole, respectively, while your waist needs to be bare for certain inverts. In short, sex appeal is not the only reason why pole dancers wear what they do!

I used an existing pair of booty shorts as my 'pattern' for the proportions and shape of these ones, but added in the open side panels with elastic strapping. You can't see it in these photos but the butt features that scrunch butt ruching that is very flattering. ;) The top was harder since this was my first time using soft bra cups and I found them really hard to place properly in the lining--mostly because the strappiness of the top meant I wasn't able to really try it on until it was fully assembled, and I needed to put the lining in before then! Luckily, I have a small chest so I didn't need anything more than the cups and a thick elastic bottom band to keep everything supported. The center of the bust is also gathered to match the shorts and create a more flattering neckline for my shape. And that strappy back (or backless)....perfection! Exactly what I was going for, and incredibly comfortable it turns out.

Now I just need to practice my full bracket grip until Friday!

Armored

Now that the Winter issue of Knitscene is hitting newstands and mailboxes, let's take a look at my featured designer collection! Because oh yeah....if you didn't notice, I'm the featured designer of this issue. :) Yay! From the beginning I decided I wanted to design thematically as opposed to separate pieces--partially for that Project Runway, fashion designer type experience but also because it excited me to create a body of work meant to be shown together. I really like thinking thematically, it turns out, so I have several collections in the works for the future (aka, stay tuned!) The inspiration for this collection is medieval armor and the story of its inception is interesting. Last year I spent a lot of time online dating and as it was the first time in my life I was actively dating and not relationshipping, I purposely set the bar low in terms of who I would accept dates from in order to expose myself to as many different types of people and experiences as possible. I had my general standards, for sure, but I wanted to avoid falling into the trap of only dating my 'type' (men similar to those I had previous relationships with.) Anyways, I wound up accepting a date with a guy and we went to the Higgins Armory Museum, which is now closed so I'm glad I had a chance to see it then! We took a swordfighting workshop and looked at the collection, wherein I got really excited about all the details on the armor and took a bunch of pictures with the express purpose of turning them into designs and he probably thought I was a freak. (But that's okay because for reasons that had everything to do with him and nothing to do with my knitting freakiness, there was no second date.)

haubergeonAll fancy photos by Knitscene/Harper Point Photography, armory photos by me

The Haubergeon Sweater is most directly inspired by a specific piece I saw at the Higgins Armory, this suit of armor featuring a lattice-like pauldron (shoulder armor). I instantly saw a lattice cable pattern! I played with different shoulder placements of a cable design but threw some of them out the window for being too bulky, or for encroaching too much on the chest which I knew had the possibility of looking weird on someone with a larger bust than I. Ultimately I mashed up the idea of cabled arms/shoulders with the silhouette of a haubergeon (or hauberk), which is a chain mail shirt, giving this sweater its longer tunic length and the cropped sleeves.

gloves2

I played more fast and loose with the Gothic Gloves, historically speaking. They aren't directly linked to a specific style of armor, though I drew inspiration from more decorative, mixed-metal pieces and jousting gloves. The cuff shape is very recognizable as being medieval-ish and I approached the mixed metal aspect with two different colors, some stripes and a small colorwork motif. I want to thank Carina Spencer for her Sugar Maple pattern--knitting that piece, with its paired increases and decreases to form the pointed hem without increasing the overall number of stitches, helped me figure out how to shape the point of the cuffs and keep the stitch count consistent.

cuirassiers copyThe Cuirassier's Cardigan is another more artistic rendition, if you will. I saw several lovely cable-like details on suits of armor at the Higgins Armory and sought to create a simple, everyday cardigan with a few special touches. Something that was less Ren Faire than perhaps the gloves! As such, the only tie this piece has to armor are the flowing lines and small cables which grow out of an otherwise plain background. I-cord edgings are among my favorite because of how clean they are, and I felt that paired with a zipper closure instead of buttons, they helped keep this from looking too knitting-y (where a ribbed buttonband would have taken it away from the original intent.) I like the jacket/blazer feel of this piece, which was entirely unintentional!

greaves2And now, my absolute favorite piece of the collection: Ornate Greaves! Greaves (leg armor) could be quite plain but I followed in the footsteps of more decorative pairs with the kneecap cable design and purl ridges along the calves. This was extra special because I used my friend Laura's yarn, Gynx Yarns Merino DK. I love the above-the-knee length for these, partially because of my love for thigh high socks and stockings! Practically speaking though, it's a great choice for extra warmth and it gave me more space to play with the cable design.

In terms of yarn choice, I had two purposes. The first was to pick companies that represented something to me as a designer, and the second was to create a cohesive color story.

  • The Haubergeon Pullover is knit in The Fibre Company Organik, as I used another of their yarns for my first ever Knitscene pattern (the Mountain Nettle Shawl, in Acadia.)
  • The Gothic Gloves are knit in Brooklyn Tweed Loft, a company on my knitting bucket list to design for--maybe this will be the first step towards a future collaboration? ;)
  • The Cuirassier's Cardigan is knit in Valley Yarns Colrain, as a thank you to Webs and the Elkins. Without my job there I might not be a designer at all, let alone the one I am today with the friends, fans and industry connections I can directly attribute to Webs.
  • And the Ornate Greaves are in Gynx Yarns Merino DK, because Laura deserved to be in Knitscene for taking a chance on me in our multiple collaborations, and I wanted the world to be exposed to her beautiful yarn.

When I first envisioned the collection, grey was the color that popped to mind because duh, metal. While a monochromatic, all-grey collection would be really beautiful, I am first and foremost a person that loves color and I wanted to showcase something more 'me', and an all-grey palette would not be fitting. The gloves use a neutral oatmeal and a gold for a warmer play on the silver and gold of mixed metals, and the copper of the cardigan is to represent a different metal--the warmer half of the collection. On the cooler side, we have grey legwarmers because I HAD to have one grey piece and felt a neutral color was more wearable for an accessory like this. The pullover color is a bit of a reach, but I was looking for a cool, elegant color that fit with the rest of the palette rather than being a bright pop. Purple was a sought-after color in medieval Europe, after all!

My biggest goal for the collection was to draw inspiration from armor while creating modern and wearable pieces as opposed to costume items. Because of that, it's not a 100% historically accurate look at medieval armor but I am beyond pleased with the end result. What do you think--did I pull it off? Can you see yourself or someone you know wearing these pieces?

(Many thanks to Amy Palmer at Knitscene for accepting my proposal, the other folks at Knitscene for the fabulous styling of these garments, the yarn companies listed above for their excellent yarn support, and Robin Shroyer for writing a great article about me and for creating possibly the best interview ever!)

Revisiting the Kangaroo Dyer

I am extraordinarily lucky to have contact with fantastic creative people every day, whether it's my coworkers at the store on a work day there, the myriad of knitters and designers I'm in contact with online, my pole dancing/circus family, or my friends. Getting out of my creative niche to explore someone else's is fun AND mentally refreshing! I've dyed with Gail (the Kangaroo Dyer) once before, four years ago--my one and only time dyeing until recently, when she invited me back in her studio for take two. Now I'm older, wiser (lol right)....well at the very least, I was more confident in my dyeing skills this time since it wasn't completely foreign! 2One of the more awe striking sights in Gail's dye studio is her large collection of orange juice containers, testament to her lifelong love affair with Vitamin C...In all seriousness, friends and students donate the containers to her so she doesn't overdo it on the OJ! Those shelves house her ready-to-go dye mixtures and the dye powders themselves are conveniently lined up behind each solution when the time comes to make a new batch.

First agenda was to dye some superwash merino worsted yarn. With the help of handy dye color cards, I picked out three colors that sparked my interest and tested them on coffee filters until deciding on the right level of saturation for each.

dyeing processThen...dyeing time! I handpainted the hanks in sections and tried to blend each color into the next to avoid any harshness.

photo 2I can't wait to use my gorgeous yarn and see how it looks knit up!

Next, Gail offered something new--a chance to dye silk fabric! I have extensive summer camp tie-dye experience but that's about it. Since I decided I wanted to pleat the silk before dyeing it, this part was somewhat familiar thanks to my tie-dye days! Gail helped me fold the 2 yards of silk and then roll it up like a jelly roll. I submerged each side of the roll in a different dye color before opening up the fabric and overdying in stripes. I then scrunched up the fabric before adding the final layer to create the dimension I was looking for.

photo 3I plan to sew with it and I've got my eye on La Sylphide (the blouse version), once I have some fun money to snag the pattern with. I love it....it's like yummy chartreusey endivey goodness!

Gail's studio is so cute. Her whole house in general is overflowing with her love of color and her work--there is yarn draping over furniture, drying on her front porch if the weather is nice, scraps of silk and other dyed fabrics on her kitchen table. I couldn't help but take a few shots of of her workspace to try and share that Kangaroo Dyer essence.

studioMy creative mojo is now working overtime!

Participation

Let's talk about Kickstarter. Pledge a donation to the project of your choice, whether it be an indie dyer's studio start-up or the publishing of a book, and get sweet rewards in return. It's easier and more fun to participate as a donor when you get a taste of what your money is helping to support--fuzzy feelings only go so far! But there is a lot more to be garnered than just goodies. Crowdfunding is currently one of the best tools we can embrace as members of the fiber arts community. The rise of indie, DIY ethos in our industry has changed everything. We can pick out individual game changers, like Ysolda Teague who really championed the business model of the self-published designer, or Knitty and Ravelry who gave those designers easily accessible venues to showcase their work in. (But that's not the point, as wonderful as those three are!) We as a community embraced the tide of change and not only went with it, but encouraged it. We flocked to Knitty and Ravelry. We support indie designers without their own yarn lines, who aren't attached to distributors or publishing houses. In short, our little crafty environment is what it is now because of all of us. Burning Man has a principle of radical inclusion, where everyone is welcome. I see this principle in action on Twitter, in the booth of an up-and-coming dyer at TNNA, in the varied types of customers that come into Webs.

Obviously we're all creative people. We're crafters! Which is why I think we have (and should continue) to feel comfortable dictating the trends and terms of the industry. Crowdfunding allows us to all participate in the future of our community in a more direct way that buying an individual pattern or one skein of indie yarn, by supporting the projects we NEED to see come to life. I dearly love and enjoy the products that large yarn companies and well-known publishers put out, so this is not a diss to them. I simply believe that the more resources and ideas we have available as crafters, the better! If we limit our access, aren't we limiting our creativity?

So next time you see a great idea on Kickstarter, think of what our knitting world will be like with that idea--and what it would be like without it. Participate in some radical inclusion by donating for the ideas you truly believe in. I supported Doomsday Knits when it was first proposed, and I've recently contributed to Midwestern Knits (which is still funding!) Make a difference AND get some pretty yarn or something. Wins all around!

Different Kind of DIY: Garage Gym Makeover

In June, Mark and I undertook the massive task of converting our not-a-real-garage into a garage gym!

beforeBefore: outside and in

"Not-a-real-garage" because it had no door and that opening isn't large enough to fit a car into, so it mostly became the repository for random stuff. (Obviously these before pictures are after it was cleaned out of junk.) We rent, and this structure was already here and wired, which was great because we didn't have to mess with that--only needed to get our landlord's permission!

The first step was to prep for a poured concrete floor. Since Mark has a contractor's license and this was his baby, he did most of the labor though I helped out when I could. It was his first time working with concrete but luckily, his father used to work as a mason so in addition to watching lots of This Old House videos, we had an expert who advised us on the prep and then helped out the day of the pour. Super win! We rented a plate compactor for the day to tamp down the dirt floor in preparation, and to press down some gravel that we used to level out the floor. Somehow we managed to fit it into the backseat of my Honda Civic--the rental guy was very impressed with that trick. Then Mark laid down the concrete mesh, which is just thick wire mesh that covers the floor to make the concrete stronger. (I was able to help a little with this part, ha.) Seeing as we had an opening in our structure and weren't pouring a closed off foundation, we had to place boards across the opening and shore them up with little props so the concrete wouldn't spill out on to the lawn.

We contracted a local company to deliver the concrete on a Saturday morning and the truck was HUGE! It's one thing to pass one on the highway and quite another to see one dominating your driveway:

duringDuring: concrete delivery and Mark hand float finishing the surface

Once the concrete is poured and spread to all the areas you are covering, it comes time to float the surface! Floating=making the top nice and smooth, leveling and filling in any gaps, basically creating the look of the finished floor. (The concrete delivery guy had left by this point, they don't help with anything past dumping the concrete.) We rented a bull float, which kind of looks like a large metal Swiffer without a pad on it, LOL, but it was in poor condition and was messing up the surface rather than smoothing it. Mark's dad to the rescue! He showed us how you can finish it entirely by hand, using boards to kneel on to avoid sinking into the concrete, though we did have to wait a little bit after it was poured for the concrete to reach this stage to make the support possible. You can't wait too long to float the surface or the concrete becomes unworkable and the 'cream' (the moisture that rises to the top when you float it) is no longer present, and that's needed to smooth things over. Professional concrete contractors have power float machines which can get that super smooth and shiny finish seen in stores, but we weren't about to get into that so our floor isn't perfectly smooth (though entirely useable). Mark and I also put our handprints into one corner before the concrete dried :)

After the floor had cured for a few days, Mark began framing the opening so we could put in a door.

afterDuring/after: framing and the final outside (I'm wearing an unpublished sweater design, hence the censorship!)

We painted our door red because, why not? The wall we built to close the opening is painted brown, but it pulls more purple in some light which is why it looks purpe-ly above. Currently the rest of the structure is unpainted, though we'd like to paint the rest of it someday and add gutters, if we can come to an agreement with our landlord to reduce rent in exchange for those labors.

So what's inside?

photo 4After: the finished inside!

All the workout goodies! We have:

  • power rack with T-bar row attachment, on the lifting platform Mark built
  • Olympic bar and 500 lbs of plates (that's including the bar's weight)
  • adjustable weight bench
  • two mirrors
  • ballet barre for stretching
  • heavy bag
  • full set of dumbbells and 2 kettlebells, ab wheel, wrist/ankle weights
  • exercise ball, pull-up bands and resistance bands
  • yoga mats and blocks
  • two pull-up bars (one is part of the rack, the other is separate)
  • gymnast rings

It's incredible to have this at our disposal 24/7, only a few feet from our house. Mark lifts almost daily, since he's currently following 5/3/1 (a powerlifting program). I use the gym more sporadically because I'm attending fabric and pole classes every week, but it's great to have the freedom to pop in when I want a quick workout or have the urge to try something new. Currently my favorite use of it is to do some short lifting sets, either squats or deadlifts, and then do pull-ups and aerial conditioning on the rings. I like to invert on them and cycle through different positions (split, pencil, pike) and lower myself down really slow. My goal is to be able to do skin the cat!

If you're local and want to workout with us...let's do it!

Balance

balance and progressFinally nailing my shoulder mount (left); handstand progressions & improving form (right)

So far, the best thing about my new gig is that I have time to enjoy being me. That includes extra pole sessions, late night Fallout 3 marathons, and the luxury of spending an afternoon reading--something I haven't done in years because of the guilt of not constantly forcing myself to be productive, to do something 'worthwhile.'

When I imagined my new life I thought I would be ten times more productive, because I assumed I would spend all my spare time knitting and doing the myriad assortment of related designer tasks (as I had done previously in every spare moment I had outside of work). More spare time=more work, right? Instead, I'm taking time to live...and my designing isn't suffering.

This is your regularly scheduled reminder to strive for balance. I'm a couple years late to the message though!

Free Pattern: Rainbow Slip Mitts

smilehI have a free pattern for you today! These were inspired by some work I'm doing with my friend Gail, The Kangaroo Dyer. She put together these colorful mini skeins in her Poet Seat Fingering base--she calls it her 'first aid kit' for color--and gave me a batch to play with. I decided to put them to good use in this super easy pair of handwarmers! They are worked flat and seamed partially up the side to create an opening for the thumb. Rainbow Slip Mitts

Finished Size: 7" around, 4.75" long (17.80cm x 12cm)

Yarn: approx 50 yards of natural and scrap amounts of 5 colors. I used RainCityKnits MCN Fingering in Natural, and a Kangaroo Dyer Poet Seat Fingering Mini Skein Kit. This is a great way to use up precious leftovers!

Materials: US 3 (3.25mm) needle, tapestry needle

Gauge: 30 sts by 38 rows = 4" (10cm) in rainbow slip pattern. Gauge is not crucial for this project.

Using natural, CO 49 sts leaving a long tail to seam with at the end. Row 1 (RS): Slip 1, *p1, k1; rep from * to end. Row 2 (WS): Slip 1, *k1, p1; rep from * to end. Repeat these 2 rows until work measures 1.5" from beginning. Knit 1 row, then purl 1 row. Begin rainbow slip pattern.

Switch to pink (or your first color). Row 1 (RS): K1, *slip 1, k1; rep from * to end. Row 2: Repeat the last row. Row 3: Knit. Row 4: Purl.

Switch to orange (or your next color). Row 5: K2, slip 1, *k1, slip 1; rep from * until 2 sts remain, k2. Row 6: P1, k1, *slip 1, k1; rep from * until 1 st remains, p1. Row 7: Knit. Row 8: Purl.

Switch to yellow. Row 9: K1, *slip 1, k1; rep from * to end. Row 10: Repeat the last row. Row 11: Knit. Row 12: Purl.

Switch to green. Row 13: K2, slip 1, *k1, slip 1; rep from * until 2 sts remain, k2. Row 14: P1, k1, *slip 1, k1; rep from * until 1 st remains, p1. Row 15: Knit. Row 16: Purl.

Switch to indigo. Row 17: K1, *slip 1, k1; rep from * to end. Row 18: Repeat the last row. Row 19: Knit. Row 20: Purl.

Switch to pink. Row 21: K2, slip 1, *k1, slip 1; rep from * until 2 sts remain, k2. Row 22: P1, k1, *slip 1, k1; rep from * until 1 st remains, p1. Row 23: Knit. Row 24: Purl.

Switch to orange. Row 25: K1, *slip 1, k1; rep from * to end. Row 26: Repeat the last row. Row 27: Knit. Row 28: Purl.

Switch to yellow. Row 29: K2, slip 1, *k1, slip 1; rep from * until 2 sts remain, k2. Row 30: P1, k1, *slip 1, k1; rep from * until 1 st remains, p1. Row 31: Knit. Row 32: Purl.

Switch to green. Row 33: K1, *slip 1, k1; rep from * to end. Row 34: Repeat the last row. Row 35: Knit. Row 36: Purl.

Switch to indigo. Row 37: K2, slip 1, *k1, slip 1; rep from * until 2 sts remain, k2. Row 38: P1, k1, *slip 1, k1; rep from * until 1 st remains, p1. Row 39: Knit. Row 40: Purl.

Switch back to natural. Knit one row. Row 1 (WS): Slip 1, *k1, p1; rep from * to end. Row 2 (RS): Slip 1, *p1, k1; rep from * to end. Repeat these two rows once more, then work 1 more WS row. On next RS row, BO all sts in pattern and leave a long tail to seam with.

Weave in ends. Using your tail from casting on, seam the bottom of the mitt 2" up the side. Use the tail from your BO to seam the top of the mitt 1" down the side. This will leave a 1.75" opening along the side for your thumb, but adjust the length and placement of side seams as needed to comfortably fit your hand. Repeat for the second mitt (they are identical.)

IMG_1776 editedHappy slip knitting!

My Finished OAL Dress

I finished the day after the deadline...but I finished my Outfit Along dress all the same! photo 3I went with the official OAL pattern, Simplicity 1803. This is bodice view C with cap sleeves. I cut a 6 on top and graded to an 8 for the bottom, since the finished measurements for the waist on a size 6 was my exact waist measurement and I wanted to have room to move, but I probably didn't need to do that as I wound up taking out a lot of ease at the waist when I put the zipper in. I also made the adjustments for petite ladies because I'm short, yo. The only other mod I made to the original pattern was moving the pockets to the side seams where they BELONGED rather than keeping them in the weird princess seam panels along the front.

photo 1(2)The fabric is a Betsy Johnson floral cotton print I bought from Mood Fabrics, which was really fun because I could pretend I was on Project Runway when I got the package in the mail. It's definitely super girly, but I don't have any girly pink floral dresses! I wore it belted with my kitty shoes yesterday (for comfort) but I can totally see this with flats, sandals, heels, a slouchy cardigan in winter....lots of options.

I am really proud of the insides of this dress! For those of you that don't know, I've been sewing since I was a teenager but I always made up my own patterns because I didn't have the patience and understanding to follow patterns. I even participated in a fashion show in high school with my own collection! I never finished seams and worked a lot with knits, where it didn't matter that I didn't finish seams. So this dress is pretty special to me since it's probably the first time I have followed a pattern to the letter AND did all those professional niceties to the insides.

insidesTo stretch my wings I used a variety of techniques. I did clean finish seams on the center and sides of the bodice, zig zag edges for the princess seams, skirt and sleeves, and a bound seam for the waistband with bias tape. (Plz to be ignoring my less than perfectly straight stitching on the waistband and hem.) For the hem, I chopped a bunch off since the dress as it stood was too long for lil ol' me, but I calculated wrong and chopped too much off to do a turned hem. Thank god for Lauren and her wonderful OAL posts--I stole her idea of hemming using seam binding! I used some cream ribbon I had on hand to match the waist binding, though by that point I was pretty fed up by fussing with the hem so my stitching is terribad. You can't see the thread from the right side though so IDGAF.

You'll notice I didn't make a full outfit--I have enough knitting to do for work that I wasn't up to knitting an accompanying piece. I am so glad Andi and Lauren put this together though! I feel like my sewing mojo is in full swing and I am super excited to add more pieces to my handmade wardrobe.

It's KAL Time!

Looking for some knitting motivation? Join the Accessorize Yourself KAL! From August 15th to September 30th, choose any of my accessory patterns and knit along with us in my Ravelry group. My currently available self published accessory patterns will be 20% off from now until the start of the KAL with coupon code ACCESSORIZE, so if you've been waiting to pull the trigger on one of those designs, now would indeed be the time! Of course, I am offering lovely prizes to the victors. The grand prize for one lucky person will be a one-of-a-kind skein of Valley Yarns Charlemont Hand Dyed, a Blue Sky project bag and 2 free patterns of their choosing (from my self published patterns only) from now until the end of 2014. You'll want to save at least one of those because I have some awesome fall releases coming up!

KALprizeAn awesome OOAK skein!

I'll also pick two runners up who will each receive 1 free pattern of their choosing, same stipulations as above.

Head on over to the KAL thread and join in! What better way to close out summer and kick off fall right than with a beautiful accessory and sparkling Internet conversation, eh?

Something Magical

Last year a sub call came out that I instantly squealed over. I was already swimming in work and did not need another project added to my pile--but this was a theme I could not resist. I have always been a big reader with a special attachment to fantasy, mythology and science fiction. One of my favorite books as a child was D'Aulaires' Book of Greek Myths, a book I loved so much that I covered the paper dust-jacket with contact paper so it wouldn't become torn. (I still have that book and it sits on the upstairs hallway bookshelf.) I wasn't limited to Greek mythology though and devoured books based upon legends and fairy tales from all cultures. As an adult, my single favorite book not from a series is Enchantment by Orson Scott Card, which mixes Russian fairy tales with the modern world. So when the call was released for Enchanted Knits...I couldn't help myself. It was my dream call. comboKitsunetsuki is a foxy red cardigan inspired by the Japanese mythology of the kitsune. While kitsune is the Japanese word for fox, in this context it refers to the fox spirits who frequently appear in their stories. Kitsune possess the ability to shapeshift between fox and human forms, often taking the form of a beautiful young woman. They can act as a trickster figure (akin to the wily coyote of Native American tales), have romantic dalliances with humans, or offer wisdom. Kitsunetsuki refers to the state of being possessed by a kitsune's spirit.

I wanted to create a garment that was flattering, wearable and inspired by the myth rather than being too obvious. The front features a traveling cable across the chest which imitates the shape of a fox head, and also serves the purpose of demarcation between the reverse stockinette body and the stockinette yoke. The simple front allows the large unique cable on the back to stand out. Each individual cable is meant to represent one of the kitsune's tails, as the stories hold that older and wiser kitsune are capable of earning more tails, and they join together to form a fox tail shape.

I have to admit the extent of my nerdery...my cats are named Kitsune and Tsuki.

2 kittiesKitsune (left) was the first, and I named her as such because she's gingery and has a big fluffy fox tail and as it turned out, is wily, manipulative and kind of a bitch. But I love her with all my heart because she's unabashedly herself, no holding back. As I like to joke, "Like mother like daughter!" Tsuki (right) came second, and I wanted them to have coordinating names because I am a dork. I tossed around a few other ideas based on Japanese words/mythology but none of them sounded pretty.

If you're interested in reading more about kitsune, I recommend the following:

  • Foxwife by Hiromo Goto, a short story found in The Fairy Reel
  • The Fox Wife by Ellen Steiber, a short story found in Ruby Slippers, Golden Tears
  • Strange Tales from a Chinese Studio by Pu Songling - technically this is Chinese, not Japanese, and as such the relevant stories are about huli jing. There are many similarities though, and I studied this particular book as part of my focus in Chinese History when I was in college.

Happy knitting AND happy reading!

A Different Kind of Stash

Thanks to horrible/wonderful enabler Emily Ringelman I discovered the wonders of Girl Charlee, online fabric paradise for the print lover on a budget--hey, that's me! In preparation for my upcoming descent into poverty, I snagged some fabric now so I can keep on sewing. I have a super modest fabric stash, most of which is leftover pieces from old projects....so this is really my first official fabric haul! dresses

I grabbed both of these knits to make as-yet-undetermined dresses. Thinking Lady Skater for one and not sure on the other--any suggestions?

tops

That adorable (and now sold out) fox knit is destined to become a Briar! I'm liking the cropped version but we shall see. The multi is crepe de chine which I've never used. I think it would be suitable for blouse, maybe something tunic-y? Suggestions also welcome there! (And if my fabric + pattern matching skills are completely off base, do speak up experienced sewists. I WILL thank you!)

fabric4

And lastly, some cotton lawn for a Hollyburn! I'll have to line it though since the fabric is a little sheer.

First of all though, I need to finish my damn dress for the Outfit Along! I only have to sew in the zipper, hem and finish up the armholes but I've been dragging ass on it since I don't like doing zippers. If I make decent progress on my deadline knit for this weekend I've told myself I WILL finish the dress. Not allowed to play with new fabric until I do!

Adventures in Wonderland

IMG_5376smAll photos in this post by Lindsey Topham unless stated otherwise

I've once again teamed up with Gynx Yarns to bring you an amazing accessory collaboration! Meet Advice From a Caterpillar, my contribution to Laura's Alice in Wonderland themed kit she is debuting at SSK this month.

Laura contacted me asking if I could whip up a one or two skein accessory design to fit her planned theme and of course I had to say yes. She is always a joy to work with--not only is the yarn beautiful, but she trusts me as a designer and lets my imagination run wild. Laura dyed up three exclusive Wonderland inspired colorways just for the kits (my shawl uses 'Wonderland') and asked Little Skein in the Big Wool to contribute a matching project bag. Take a look!

kit collagePhotos by Gynx Yarns - yarn colors from L to R are Wonderland, Cheshire Cat & Caterpillar

I happen to have one of those project bags myself (advance perks y'all!) and the construction is FABULOUS. Really sturdy and the fabric is adorable.

In case you couldn't guess it from the name, my shawlette drew inspiration from the Caterpillar. I have to admit, I am a bigger fan of Through the Looking Glass but I wanted to go with the original book for this one. I was imagining the cables as wriggly caterpillars at first, then I realized the cables' transition to ribbing and back again was an apt metaphor for metamorphosis. Caterpillar to butterfly, Alice to Big and Little Versions of Herself, and so on. Pretend you're an art student and fill in with your long-reaching explanation of choice.

blog collageAs luck would have it, this turned out to be the most perfect photoshoot yet! Lighting, location, styling--everything was on point to create a magical mood.

If you're not attending SSK, look for kits/preorders to appear in the Gynx Etsy Shop around July 22nd. I'll make an announcement when the pattern is available for individual sale. Til then, beware of the Jabberwocky, eh?

Long Overdue

Some of the best things take forever. Over a year later...I finally finished my Sugar Maple! photo 2SO. GOOD! The pattern is by Carina Spencer and is genius in its simplicity. I obviously don't have much free time to knit other designer's patterns anymore so I really relish it when I do. It's a vacation, but I learn a ton at the same time studying how they write and format their patterns, seeing how different we brain things, etc. The yarn is a double gradient maki of Play at Life Fiber Arts Scrumpet in the Silky Cocoon colorway. First of all, having only two ends to weave in=amazing. Oh I'm sorry--I should have said first of all, DAT GRADIENT!

1I was unsure on how this style would look on me at first, since I prefer fitted clothing and this has a bit of a swingy A-line shape. Of course, no need to worry as it's flattering and wearable! My only changes were to work it at a slightly different gauge (laziness) and I knit regular 1x1 ribbing for the edges instead of twisted ribbing (not reading properly, then laziness.)

Summer of 2014 is officially on, popping and stylish!

A Whole New World

I have a very exciting announcement to make. In about a month, I'll be leaving my job so I can focus on designing! Ok, I'm not exactly jumping off a financial bridge sans bungee cord. I'll still be working for Webs in a different, part-time capacity--enabling me to pay bills and all that good stuff. But there will be plenty of free time in my schedule which means more designing, more time on social media and definitely more time on here, which is something I've been severely neglecting. (Ahem. Sorry about that.)

In preparation I rearranged my bedroom. Meet my new bedroom-slash-studio!

photo 6I have no before pictures which is probably a good thing, because it was a lot messier before. But for reference--my bed was positioned where the rug is now, pushed up against the right side which you can't see in this photo since it's around a slight corner. I also had a bunny guest for an extended period of time whose luxurious daytime enclosure took up most of the space where my bed now lives. It may not look like much but I have my desk, my sewing machine and my yarn & fabric stashes, all of which used to live downstairs. And that floor space, with the cutest Ikea rug to boot! I've been sprawling out on it to sew (more on that in another post) and it is glorious. It functions beautifully as a backdrop for photos, which my Instagram feed will attest to.

In the spirit of new beginnings, I'm thinking of hosting a KAL in the near future. Something casual (with prizes of course), so if you are interested or have any thoughts on the matter head on over to my Ravelry group and answer a quick poll about KALs, won't you?

xoxo

Spring Cleaning

Some people clean in the spring. I don't because let's be honest, I hate cleaning no matter what the season. My dream is to be rich enough to afford a house husband who can stay home and do all the cooking and cleaning so I don't have to. (But without the actually being married part because right now in my life I don't believe in marriage. House lifetime partner?) Though I don't break out the vacuum when nice weather hits, I'm not immune to that tantalizing rush of Change and New Beginnings that flows through the air--I find it more seductive than the other time of year when people love to plan Big Changes, aka January 1st. What new things have I been testing out then? As of a few hours ago...plants!

succulentsMaybe it's a tad pathetic that I'm proud of my ability to pick out plants at Home Depot and put them all in a pot together but look Ma, plants! I am not Green Thumb Girl. I am more like apathetic, I will have a garden if you do all the work just so I can get fresh vegetables Girl. Plants are a mystical confusing world that has never really interested me, though I can agree that they are pretty. Plus these ones thrive on neglect, according to the internet, which is perfect for me! I would have kids if kids also thrived on neglect! (Just kidding. That is why I have cats though.) I have to admit, I've been looking at pictures of succulents in cutely shaped planters after bringing home these babies and I am not against getting more. Waiting to make sure I don't kill the test batch first though!

I'm also halfway through my April Challenges! I meant to post about this on April 1st and here we are...13 days later... As I'm sure you've guessed, health and fitness challenges are my jam if I'm going to do any kind of personal challenge at all. See: Whole 30, Rugged Maniac, and so on. I felt like I was coasting and wanted to set myself a few challenges to push myself a little this month and hopefully ingrain some new habits. They aren't a very hard investment which is good since I am pretty busy in general right now and didn't want to feel overwhelmed.

  • My first challenge is a Green Smoothie Challenge! I am pushing myself to drink 3-4 green smoothies a week. Currently I am on a kick of spinach, mango and pineapple smoothies but I have also done spinach and various berries. I have yet to branch out into other greens instead of spinach, though I did make one avocado, pineapple and coconut milk smoothie which still counts as green in my book. Once I found some good green smoothie tips and got my proportions all sorted out, this challenge came easy! No more swamp water concoctions for me.
  • My second challenge is a Hula Hooping Challenge! One of my friends posted this hooping challenge to Facebook and I really liked it, but I can't commit to 30 minutes of hooping every day. Especially on days where I have a circus or pole class after work, by the time I get home I'm wiped out already! Instead I told myself I simply need to hoop every day this month, no matter what the time span. I haven't hooped in a long time so just getting in the groove regularly is really helpful, even if I'm only managing to do it for 10 minutes! Unfortunately...I already technically failed this one since I missed a day last weekend. :( Completely forgot about it. One mistake doesn't mean giving up and I'm soldiering on to finish it with a 99.9% success rate.
  • The final challenge is a Squat Challenge! This one was not planned originally, but a fitness group on Ravelry I'm a member of is doing a group squat challenge for April and I couldn't resist joining in. When the month is out, I'll have completed 2,035 squats--yowza! I am mostly doing them with just bodyweight, but if I happen to be in the gym doing squats on the same day as challenge squats are assigned, my back squats count towards the day's challenge total I decided. Mostly because if I do a bunch of squats in the gym I am not re-doing them all again at home later.

Other new things: took an aerial rope workshop yesterday; just started watching Mad Men; changed the background on my phone. (Scintillating, I know.)

What's new in your life?